Showing posts with label chinook hops. Show all posts

Thursday, February 14, 2013

Homebrew Time Lapse, Hoptastic IPA

Just over a year went by since my last entry, crazy!  The kid has grown and another is on the way.  Life moves fast now.  With limited time, I found that Twitter was the best medium to share my latest brewing adventures.  Posting the below time lapse video of my last brew day really brought me back here.  This brew was the 16th batch on the new system which has now yielded 195 gallons.  On my old 5 gallon system, the same volume would have taken 39 batches.  Since I started brewing with the B3 2050, I have been really enjoying splitting a batch in increments of 5 gallons to test out different yeast strains.  In the future, I want to also experiment with varying fermentation temperature schedules.
The video below was taken using a time lapse camera over the course of a casual homebrew day.  The camera took one shot every 2 seconds and compiled the images at a rate of 30 frames per second.  I edited out some of the longer waits (all grain, all day) to show more of the busy-body action of the day.  For a better resolution video, you can go here Chillindamos Homebrew Time Lapse.


Hoptastic IPA
Imperial IPA
BJCP: 14C
Date: 02/10/2013
Type: All Grain
Brewer: Sean
Batch Size: 15.50 gal
Asst Brewer:
Boil Time: 90 min
Equipment: 15G B3 2050
Est Original Gravity: 1.073 SG
Measured Original Gravity: 1.072 SG
Est Final Gravity: 1.012 SG
Measured Final Gravity: 1.012 SG
Estimated Alcohol by Vol: 8.2 %
Actual Alcohol by Vol: 7.9 %
IBUs (Tinseth’s): 110.7 IBUs
Est Color: 9.6 SRM
Total Hop Weight: 21.50 oz
Calories: 243.1 kcal/12oz
Description:
Ingredients
Amt Name Type # %/IBU
38.20 gal SD Alvarado Water 1 -
6.00 g Gypsum (Calcium Sulfate) (Mash 60.0 mins) Water Agent 2 -
35 lbs Brewers Malt 2-Row (Briess) (1.8 SRM) Grain 3 81.4 %
3 lbs 8.0 oz Munich (Dingemans) (5.5 SRM) Grain 4 8.1 %
2 lbs Caramel/Crystal Malt - 20L (20.0 SRM) Grain 5 4.7 %
2 lbs Caramel/Crystal Malt - 60L (60.0 SRM) Grain 6 4.7 %
8.0 oz Wheat - White Malt (Briess) (2.3 SRM) Grain 7 1.2 %
1.50 oz Homegrown Chinook [13.00 %] - First Wort 90.0 min Hop 8 27.9 IBUs
2.00 oz Homegrown Chinook [13.00 %] - Boil 60.0 min Hop 9 33.8 IBUs
1.00 oz Homegrown Columbus [14.00 %] - Boil 60.0 min Hop 10 18.2 IBUs
6.00 g Gypsum (Calcium Sulfate) (Boil 60.0 mins) Water Agent 11 -
2.00 oz Homegrown Columbus [14.00 %] - Boil 20.0 min Hop 12 12.2 IBUs
1.00 oz Homegrown Cascade [5.50 %] - Boil 20.0 min Hop 13 2.4 IBUs
1.00 oz Simcoe [13.00 %] - Boil 20.0 min Hop 14 5.7 IBUs
1.00 oz Homegrown Cascade [5.50 %] - Boil 5.0 min Hop 15 1.2 IBUs
1.00 oz Simcoe [13.00 %] - Boil 5.0 min Hop 16 2.8 IBUs
1.00 oz Homegrown Cascade 20 min Whirlpool [5.50 %] - Boil 1.0 min Hop 17 1.3 IBUs
1.00 oz Homegrown Centennial 20 min Whirlpool [10.00 %] - Boil 1.0 min Hop 18 2.2 IBUs
1.00 oz Homegrown Columbus 20 min Whirlpool [14.00 %] - Boil 1.0 min Hop 19 3.0 IBUs
1.40 oz Simcoe Rocket 175°F [13.00 %] - Aroma Steep 0.0 min Hop 20 0.0 IBUs
0.45 oz Homegrown Centennial Rocket 175°F [10.00 %] - Aroma Steep 0.0 min Hop 21 0.0 IBUs
0.15 oz Homegrown Cascade Rocket 175°F [5.50 %] - Aroma Steep 0.0 min Hop 22 0.0 IBUs
1.0 pkg California Ale (White Labs #WLP001) [35.49 ml] Yeast 23 -
1.0 pkg Dry English Ale (White Labs #WLP007) [35.49 ml] Yeast 24 -
1.0 pkg Pacific Ale (White Labs #WLP041) [35.49 ml] Yeast 25 -
3.00 oz Homegrown Cascade [5.50 %] - Dry Hop 10.0 Days Hop 26 0.0 IBUs
3.00 oz Homegrown Centennial [10.00 %] - Dry Hop 10.0 Days Hop 27 0.0 IBUs
Mash Steps
Name Description Step Temperature Step Time
Infusion Add 52.47 qt of water at 161.3 F 148.0 F 70 min
Mash Step Heat to 168.0 F over 50 min 168.0 F 5 min
 
Mash Type: SMART 148 and Mash Out
Total Grain Weight: 43 lbs
Sparge Temperature: 168.0 F
Pre-boil Volume: 18.95 gal


Days in Primary: 7.00
Primary Temperature: 68.0 F
Days in Secondary: 10.00
Secondary Temperature: 66.0 F
Days in Tertiary: 7.00
Tertiary Temperature: 65.0 F


Carbonation Type: Keg
Volumes of CO2: 2.4
Pressure/Weight: 13.72 PSI
Carbonation Used: Keg with 13.72 PSI
Keg/Bottling Temperature: 45.0 F
Storage Temperature: 42.0 F

Notes: B3 2050 Batch #16
Divded wort into 3 five gallon carboys pitched with 1 vial each of the 3 yeast strains. No starters. One minute of oxygen via diffusion stone in each carboy. Also, 1 vial of WLN4000 Clarity-Ferm in each carboy (first time use).
Created with BeerSmith

Sunday, February 27, 2011

Stay Classy IPA, February 27, 2011

I'm getting a bit excited for this year's AHA Conference here in San Diego.  The conference is hosted by a different city each year and usually it's too far to travel.  This will be my first National Homebrewers' Conference and I'm looking forward to all the fun other members in my homebrew club, QUAFF, talk about each year (yes, some go every year!).
Want to go!?  Better register soon, the conference is selling out fast!
One of the famed events during the conference is club night.  I know I can count on QUAFF to fully represent with a great showcase of homebrews and energy.  I haven't heard an announcement yet but I know that QUAFF will soon be asking us to contribute kegs for club night.  While hoppy is something I've always enjoyed, I haven't brewed hoppy in quite some time (probably since IPA pours out of drinking fountains around here!).  Here's to my renewed adventures in homebrews drenched in IBUs and contributing to the masses of hop heads at NHC.  Not sure if this beer will be around by then but you can count on this brew to be good learning ground.

Vessel Calibration in BeerTools Pro
One of the key draws to using brewing software is the ability to calculate strike and target temperatures during the mash.  It would enable you to better hit your temps when variables such as volume, time, and temperature change.  In BeerTools Pro, it allows you to run basic experiments to establish heating parameters for your brewing equipment.  Basically, calibration involves pouring a selected volume of heated water in each your mash tun, hot liquor tank, and kettle to measure the amount of heat loss over a specific amount of time.  The software also allows you to test your heating element to measure how fast you can heat a selected volume (useful for estimating heating times). 
Kettle calibration in BeerTools Pro to determine heat properties.
Before the software, it has been a bit of art and skill to hit desired mash temperatures.  A homebrewer gets to know his/her equipment with experience and eventually, it gets easier to hit your target temps. The problem was that I can sometimes be a couple of degrees off.  Seems to not be a very big deal but enzyme activity can be very temperature specific.  If you ever want to recreate the conditions that made that great beer, it's imperative to know how to hit your desired temperatures every time.
I would be very happy if I can trust the software to guided me to my mash temperatures every time.  After today's batch, it is apparent that I have a bit of tweaking to do.  I'm not sure if I should go through the calibration process again (for the mash tun only) or simply tweak the time point temperatures to match the observed temperatures during a brew day.  Oh, I should also verify/calibrate my thermometer before doing so (or would it an unknown thermometer provide acceptable relative values?) and for future brews.
Today's Mash Schedule with calculated strike temperatures in the Temp column.
Looking above, I heated my 3.44 (or close to that) gallons to 171.5°F for mash-in.  After 3 minutes of stirring and stabilizing, the mash was moderately consistent at 153°F.  Close enough for me and I was pretty excited.  At the end of the saccharification rest, BeerTools shows that I should have lost enough heat to have a final temp of 147.4°F.  My actual ending temperature was 152°F (only a loss of 1°).  Perhaps if I simply adjust my Mash Tun Calibration parameters for "Temp. After 5 Minutes" to lose 1° less and "Temp. After 65 Minutes" to show a total loss of also just 1°, I might be able to make this work. 
On to the beer,  check out that ingredient list!  Insane.  I used to try and simplify as much as possible (less is more) and now my homebrews are practically including the kitchen sink.  The ingredient list doesn't even include the adjusted water profile and salts.  As for the IBUs, doesn't the calculated 112.3 seem to be just too far out there for this hop schedule!?  I'll save that issue for another time, I need to chillindamos!

Stay Classy IPA

14-B American IPA
Author: Chillindamos
Date: 2/27/11
BeerTools Pro Color Graphic
Size: 5.0 gal
Efficiency: 74.78%
Attenuation: 75.0%
Calories: 217.06 kcal per 12.0 fl oz
Original Gravity: 1.065 (1.056 - 1.075)
|===============#================|

Terminal Gravity: 1.016 (1.010 - 1.018)
|====================#===========|

Color: 6.85 (6.0 - 15.0)
|=========#======================|

Alcohol: 6.41% (5.5% - 7.5%)
|===============#================|

Bitterness: 112.3 (40.0 - 70.0)
|================================|

Ingredients:

9.0 lb 2-Row Brewers Malt
1.0 lb German Vienna
0.5 lb Belgian Munich
0.5 lb Crystal Malt 20°L
3.0 tsp 5.2 pH Stabilizer - added during mash
1.0 lb Dried Rice Extract
1.0 oz Homegrown Chinook (11.0%) - added first wort, boiled 90.0 min
1.0 oz Magnum (10.6%) - added during boil, boiled 60.0 min
1 tsp Whirlfloc Tablets (Irish moss) - added during boil, boiled 15.0 min
1.0 oz Homegrown Chinook (11.0%) - added during boil, boiled 10.0 min
1.0 oz Homegrown Centennial (10.0%) - added during boil, boiled 10.0 min
1.0 tsp Servomyces - added during boil, boiled 10.0 min
0.1 tsp Anti-Foam - added during boil, boiled 1.0 min
0.5 oz Simcoe (12.3%) - added during boil, boiled 0.0 min
0.5 oz Citra (14.0%) - added during boil, boiled 0.0 min
0.5 oz Amarillo (8.5%) - added during boil, boiled 0.0 min
1.0 ea White Labs WLP001 California Ale (update later)
0.5 oz Simcoe (12.3%) - added dry to secondary fermenter
1.0 oz Citra (14.0%) - added dry to secondary fermenter
0.5 oz Amarillo (8.5%) - added dry to secondary fermenter

Schedule:

Ambient Air: 60.0 °F
Source Water: 60.0 °F
Elevation: 0.0 m
00:14:26 Mash-In - Liquor: 3.44 gal; Strike: 171.48 °F; Target: 152.0 °F
01:14:26 Saccharification Rest - Rest: 60.0 min; Final: 147.4 °F
01:24:26 Vorlauf, bitches! - Rest: 10.0 min; Final: 146.7 °F
02:24:26 Fly Sparge - Sparge Volume: 5.1 gal; Sparge Temperature: 168.0 °F; Runoff: 5.74 gal

Notes

70% dilution rate. 4 grams Gypsum, 1 gram Epsom Salt, and 1 gram of Baking Soda added to the mash. Chinook and Centennial hops are grown at our hop farm (IBUs estimated). Mash dilution ratio: 1.04 Tap, 2.41 Water Lady (3.44 gallons total). HLT dilution ratio: 1.51 tap, 3.59 Water Lady (5.1 gallons total). Oxygen added for 60 seconds. OG 1.065 @ 66°F. 1 vial to 800ml yeast starter (used dark malt extract which should have a small impact on resulting SRM). Recently finished calibrating all vessels and mostly was able to use BeerTools software to predict target temperatures. Mash-in was over my 1°F which is close enough that I simply continued to stir the mash for a few more minutes. The calculated final temperature for the saccharification rest was the most off, about 5°F lower.
Results generated by BeerTools Pro 1.5.12


Turned out to be an awesome IPA. Kara tested for IBUs: 84.5. This value is actually higher than what I expected and certainly more than what is perceived. If I were to guess, I would say that it's around 65 IBUs.  The next IPA brewed has some minor changes and more hops.  Will be nice to also have that tested to see if the value is a tad higher than 84.5 IBUs.

Wednesday, February 23, 2011

Hop Farm Season 2011 Begins!

Around this time of year, it's usually a good idea to start getting ready for the upcoming hop growing season.  My hop farm is located in sun drenched San Diego North County.  I have three terraced rows on a north-facing slope.  Each row is setup to accommodate ten mounds (for a total of 30 mounds) which seems more than enough to handle on a casual basis.  Here's several images to show the preseason hop farm:
Hop Farm from the top of the mulch hill.
Hop Farm from the east.
Detail of the terraces with lots of weeds to pull.
Hop Farm from the lower east slope.
Hop Farm from the lower west slope. Avocado tree to the right.
Today, Michelle and I set out mostly to start weeding and mulching.  The ground was nicely wet from recent rains so the weeds were easy to pull. While we worked for quite some time, we were only able to take care of the top row (Chinook and Centennial).  Next weekend we will try to recruit Kara to come and help with the bottom two rows (although the outlook looks like rain again).
My wife, Michelle, taking out those weeds!
After the weed pulling (which never stops) and mulching, we'll need another work day to prune the mounds.   Essentially, this involves shoveling and cutting around the mound to trim down the roots to prevent the plants from popping up away from the mound.  This should also present opportunities to find rhizomes to share with others.  I have a few QUAFF buddies already signed up for Chinook and Centennial rhizomes.
Hop Farm Row 1 (Chinook and Centennial) weeded and mulched.
Beyond pruning comes trellis maintenance and restringing.  All of my posts seem to be in good condition this year.  I will need to re-anchor the end-posts of each row to help keep the top guide-line taut.   A small buried cement block might do the trick.  I know that hop farms restring each year with twine but I have been using wire.  I'm finding the wire tends to rust out after one or two season so perhaps I should also look into finding a better solution for this as well.
Row 1 from the west, after weeding and mulching.
Another concern, I need to find better solutions for the problem with rabbits and gophers chewing on the vines.  In some cases, these wascal wabbits have chewed mature cone bearing vines that essentially put an early season stop to some of my mounds.  Possibly a simple chicken-wire cage will keep the nasty gnawers at bay.  See some of my previous hops seasons' blog posts on this topic and more.
One Chinook hop mound seems to already be breaking soil.
As for this year's last planning element, I want to replace all the mounds in the middle row with two new varieties of "C" hops.  While the former two varieties,  Magnum and Vojvodina, had a good running, last year had a significant decrease in viability and yield.  It's time to get rid of these and move on.  Considering the success of my Chinook and Centennial mounds, I believe other "C" hops will likely do as well.  I recently pre-ordered Columbus hops and am crossing my fingers for Cluster or Citra to be available this year.  Even Simcoe (we'll write it "Cimcoe" to keep with the theme) would be desirable.

Here's a couple of links for buying rhizomes directly from the source.  As of now, no rhizome source has a list of what will be available this year.  Several homebrew suppliers and stores will also have rhizomes available beginning next month.  I got really excited when More Beer! announced their rhizome pre-order a couple of weeks ago and jumped at the chance to order Columbus hops.  Their pre-sale deal is only good until March 1st.
Rhizomes from Hops Direct
Rhizomes from Northwest Hops

Hops Direct made a YouTube video series last season to show the hop farming process.  They're great if you haven't seen them yet.  Hop farmer guru at Hops Direct, Stacy Puterbaugh, shows you how to plant hops and even what a large scale hop harvest looks like.  I'll share some of these videos here as the season moves on.

Hops TV, Episode 1: Planting Hops

Thursday, August 12, 2010

Dehydrating-damos Hop Oast

With the volume of hops I've been growing these days, I've long been needing a better system for dehydrating larger volumes of freshly picked hops.  According to Wikipedia, freshly picked hops can have a moisture content of 80%.  Prior to modern methods of dehydrating and making pellet hops, growers built a hop oast house to remove moisture from whole hops.  The purpose of the oast was to take the moisture content down to about 6%.  Without dehydrating, hops can quickly turn brown and eventually spoil.  You could potentially refrigerate or freeze wet hops but the moisture content can significantly shorten storage longevity.   Some like to use wet hops for brewing or dry-hopping but I  find this imparts vegetable-like flavors and aromas.
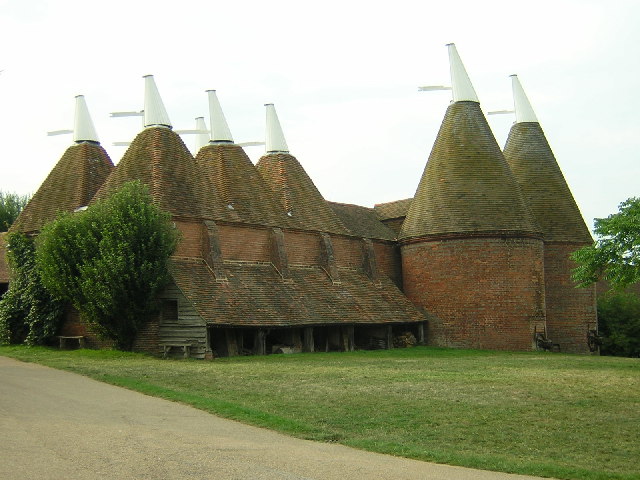
Sissinghurst Oast House in Southeast England (source below)
Oast houses had several perforated floors where hops were spread out.  At the bottom of the oast house was a kiln that applied heat through the hop laden floors.  Moisture escaped out those chimney-like rooftops.

My Former System for Dehydrating Hops
Ever since I've been growing hops, I used a common household dehydrator to do the bulk of the work.  Unfortunately, I could only dehydrate 4 square feet of hops at a time.  Considering the volume that we have typically picked off the vines at our hop farm, this simply was not enough space.
Former household dehydrator used to dry hops.
Every time we picked hops, it was always enough to fill two of these dehydrators.  We only have one!  The excess was spread out on a table at our apartment or house on paper towels.  We also turned on a fan to keep the air moving across the surface of the table.  When the hops were finished in the dehydrator (typically about 48 hours), we would transfer the table hops to the dehydrator to finish them (another 24 hours).
Dehydrating hops on a table in our old apartment.
Obviously this method of drying hops, though doable, wasn't very practical.  It limited us to how much hops we can truly pick, lengthened the time and work needed, consumed living space, and overall unchillindamos.  It did, however, make the house very aromatic.  If you want to live in an IPA, this is the way to do it!

Building a Hop Oast
The idea for the new Dehydrating-damos Hop Oast came from Food Network's show "Good Eats" hosted by Alton Brown.  The segment on the show is embedded below for you to see.  Basically, he uses common household furnace filters and a box fan to dehydrate meat and make beef jerky.

Last year, I acquired a box fan that a friend was planning on getting rid of with the intention of building a similar dehydrator for hops, the Chillindamos Dehydrating-damos Hop Oast.
The newly built oast hop tray frame.
I purchased some nicer lumber that has been sanded and has round edges (let me know if anyone wants specifics here).  Round edges make it easier when stretching the screen material.  I sized pieces to the box fan's dimensions. 
Hop oast tray frame, simple construction.
There's no need to do anything fancy.  The frame for each of the hop oast trays were built using a hand saw, nails, and wood glue.
Screen material stapled to the hop oast tray frame.
In the screen door section of the hardware store I found this heavy duty plastic-like screening that would work just right.  I used a staple gun with 1/4" staples.
Screening material stretched and stapled on the sides of the oast tray frame.
The trick to a nice taut screen is to start in the center and work your way to the corners, rotating sides each time.  This is the same technique painters use when stretching canvas on a frame.  It also works best if you have help to pull while you staple (thanks Michelle).

Dehydrating-damos Hop Oast
Building four trays and screening three of them for the latest harvest took under two hours.  After, it was a matter of dumping hops in the trays, spreading them out, stacking, and applying the box fan.
Hops dump easily into the hop oast trays.
While the heavily loaded top tray dehydrated in less than 48 hours, I plan to add two more trays (for a total of 6) to decrease the density of hops per tray, encouraging a more effective flow of air.
Hop oast trays stacked easily.
Similar to Alton Brown's dehydrator, the trays are stacked and a box fan is used to keep air flowing around the hops.  From now on, I will dehydrate my hops in the garage considering that its a dry warm environment and away from our usable living space in our house.
Box fan blows air down through the oast trays.
The trays are not directly on the garage floor, I used some wood scraps to put underneath the stack of trays.  This allows air flow to exit out the bottom.  I put the box fan on top of the trays to blow air down.  Even with one of the trays packed tight with hops, air seemed to readily flow out the bottom of the stack.  For the past two harvests, I've only kept the box fan on its lowest speed and the hops were dehydrated in less than a day and a half or about 36 hours.  (I'm thinking that if I decrease the density of the hops in each tray, I might get this process under 24 hours.)
Dehydrated hops are light and papery.
36 hours later, I opened the garage door with aromas of chinook and centennial pouring out.  The hops are light and paper-like, ready for long-term storage prep by vacuum sealing and freezing.  The trays are very easy to carry the hops to the kitchen and to shake clean.  If you need a cheap and simple system to dry a decent volume of homegrown hops, this is working out very well for me.  Let me know if you have any comments or questions!  Cheers.
More Hops = More Chillindamos
Image Source: 
Bishop, Rob. Sissinghurst Oast House. Digital image. Geograph, Sissinghurst Oast House. Geograph Britain and Ireland, 18 Feb. 2006. Web. 12 Aug. 2010. .

Saturday, August 7, 2010

American Barley Wine, August 6 2010

Challenges of Brewing BIG Beer
While most of my brews are fairly moderate in alcohol (6-8%), I tend to stray away from big beers for a handful of reasons: mash tun size, expensive ingredient list, and its difficult to achieve a balanced beer.

Big Beers Necessitate a Large Mash Tun
My mash tun simply can't handle the quantity of grain needed to brew an alcoholic monster.   My current mash tun uses a 5 gallon Rubbermaid Water Cooler and I know they also come in 7 and 10 gallon sizes.  I could easily upgrade just my mash tun to accommodate larger grain bills. As far as fitting a false bottom to a new mash tun, those come in a number of sizes as well.  Northern Brewer carries a number of False Bottom sizes and types.  MoreBeer also has a decent collection of False Bottoms.  Making 5 gallons of strong ale styles such as barley wines needs about 20-30 lbs. of grain.  I find that my 5 gallon cooler is maxed out at 15 pounds of grain.  Potentially, I could squeeze in a few more pounds at the expense of potentially losing yield but I like to keep the mash bed light and fluffy during sparging (see images below).  I can either find a larger solution or just hold out a bit longer to upgrade to a brewing sculpture with a double sized mash tun.  My vote is for the later!
5 Gallon Rubbermaid Water Cooler holding just over 15 lbs. of mash during vorlauf.
Just enough room to use a Phil's Sparger, my 5 gallon mash tun seems maxed out at 15 pounds of grain.
If you don't quite have the capacity to make a big gravity beer using grain, there's a couple of options for you to try.  First is to do two mashes and use only about 1/3 of your normal sparge volume.  Most of what you will collect during each mash is high gravity first runnings, or the sweetest collection of wort.  You'll get low efficiency and increase your brew day by a few hours but it works!  Second, you can just add malt extract to the kettle.  This is what I did today.  In a big beer like a barley wine, using extract to boost the gravity of your grain batch will not be noticeable in the final beer.  The downside is that extract is always damn expensive!

Big Beers are Expensive and Difficult
Making bigger beer styles is really like making two beers in one.  In doing so, you can expect to double your costs.  If you're using any quantity of extract, you can nearly triple the cost.  Compared to a basic style such as pale ale, a barley wine needs more than twice the base and specialty malts and could use 2-3 times more hops.  The goal in big beers is balance.  I find that even pro brewers have difficulty finding balance in their bigger beers.  Balancing alcohol with the right amount of residual malt sweetness, bitterness, and hop flavor is very challenging.  You need to plan for more than just the final bottled or kegged beer; planning for profile changes during longer-term storage should also be a  consideration.  Knowing how your beer is going to change over 6 months to 3 years adds another level of complexity.
Fermentation and attenuation can also be problematic.  With a large fermentation task at hand, big beers require lots of attention to yeast.  This means a large pitching rate of healthy yeast, well oxygenated wort, and maintaining steady fermentation temperatures.  Worse case scenario, your yeast craps out and you get a stuck fermentation leaving you with a sweet, partially fermented, beer that will just make you cry.  For the level of cost investment and time needed to mature a big beer, its a science and an art to get good results with high gravity brewing.
Time to flush all that worry out with a good beer and chillindamos.  Every new brewing adventure mandates some "research".  One of the best Barley Wines I've had recently was made by Alaskan Brewing Company.  I had their 2009 Alaskan Barley Wine Ale this past winter.  Thought I would age this bottle for a year but made the mistake of not hiding it!  Earlier this week, I was in San Francisco and toured Anchor Brewing Company (more on that later).  I had their Old Foghorn Ale which was also a great barley wine.
2009 Alaskan Barley Wine Ale
American Barley Wine, August 6 2010
BJCP Category 19C. American Barley Wine
5 Gallons, Grain and Extract, Single Infusion Mash, 90 Minute Boil

12.5 lbs. Domestic Pale 2-Row
1 lb. Crystal 60
10.3 oz. Red Wheat
8 oz. Caravienne
5.25 oz. Crystal 20
2 oz. Chocolate

90 Minute Single Infusion Mash *152°F
*difficult to keep temps consistent in the mash tun with this much grain so a little over half of the bed sat at the warmest of 152°F while the coolest layer (top) rested at 148°F

5.2 lbs. Liquid Malt Extract added to the kettle

1 oz. Simcoe 60 min.
1 oz. Simcoe 40 min.
1 Whirlfloc tab 20 min.
1 oz. Amarillo 20 min.
0.9 oz. Homegrown Chinook 10 min.
0.75 oz. Homegrown Centennial 10 min.

Dry Hop: 0.65 oz. Amarillo

Racked on yeast bed of Flanders Brown Ale/Oud Bruin using White Labs WLP001 California Ale Yeast

OG: 1.105 @ 68°F
FG:1.020 @ 66°F
ABV: 11.3%

Update 8/26: Racked to secondary.  Current gravity is 1.018 @ 75°F.   Added dry hop.

Update 11/7: Racked to 3 gallon tertiary on 1oz. American Oak Chips.  Other 2 gallons went in a keg for carbonation to be bottled on 11/11.  I will be submitting a bottle of this to our Club Only Strong Ale competition.  Tasting the hydrometer sample was very promising.  The oaked split will sit for another month before bottling that portion.  I plan to submit that to the Wood Aged Competition next year (two beers with one brew!).

Update 11/27: This beer won 1st place in our club-only strong ale competition.  Shipping out for the AHA Club-Only competition hosted by Greater Everett Brewers League in Washington.

Saturday, July 24, 2010

Hop Harvest, First Pickings

Me harvesting the Chinook Hops.  This trio of vines always has a high yield with multiple harvests.
At last, fresh homegrown hops are here!  Today we pulled a few weeds, trimmed back rogue hop vines, and harvested our first batch of Chinook and Centennial hops.  I'll let the pictures do most of the talking.
Michelle, posing at our hop farm in Escondido, CA.
During the summer, there's typically little to do at the hop farm besides harvesting.  There are 30 mounds yet we had a number of them that didn't do well this year.  This is mainly my fault for not visiting the farm more often early in the season.  This year, I need to tag or map mounds that never climbed or didn't even sprout so that I can give them attention next late winter.
Our bottom row of hops has finally produced.  We planted Centennial (near) and Chinook (far) last year.
Third time's a charm and our added bottom row is finally taking off.  I tried planting Cascade and Tettnanger when we first added this row a few years ago.  They failed maybe due to soil conditions, too dry, or the killer rabbits.  During the second year, we mirrored our successful top row by splitting rhizomes and planting Chinook and Centennial on the bottom row.  That year, mounds were brutally attacked by killer gnawing rabbits and while a handful were able to make the climb, yield was nearly negligible.  This year, we've increased the water flow rate, heavily mulched and fertilized, and ensured to allow plants to grow as full as possible at the base to deter those wascal wabbits from the main vines.
Many of the Chinook cones are papery and light, ready for picking.  Many others will be ready in 2 weeks.
Today was just the first harvest and you can tell when the hop cones are ready to pick.  They get drier or papery and become much lighter in weight.  You may also see some light browning on some cones beginning to develop.  This is when they are ready to pick.  In the early days, we used clippers and cut each one carefully off the vine.  Now, we just pull.  We try to eliminate the stem by pinching at the base.  After picking, my hands are sticky with a yellowish dirt color from all of the lupulin.  The smell, however, is hoptastic!
Chinook hops do very well here, lush full leaves with hop flowers growing at every opportunity.
Healthy, happy, and full, the Chinook trio of vines on our top row never fails to just go crazy!
The Chinook trio is loaded with hops.  Some are ready now yet we'll be be able to pick cones for many weeks.
As you can see from the above picture, the cones are in different stages.  I know the big hop growers choose an optimal timing for their vines and cut them down for a single harvest.  What do they do with underdeveloped hops or ones that have turned all brown.  My guess is that they make pellets!
Big ones!  Most Chinook hops that are ready to pick are fairly large cones.
Cone sizes and shapes vary with variety.  Hopefully, my hand gives you an idea about the size of the chinook hop cones.
Centennial hops at the top of the wire.  A terminating cone at the right.
When hops reach the top of the guide line, they often continue growing horizontally.  When a branch or vine ends, it always terminates with a cone.  When it does this, it will grow no further.  Also, if a climbing vine tip gets cut or damaged, it will no longer continue to grow.
A couple of our Centennial hop mounds don't always grow as thick and lush as the Chinook trio.  
Many hop plants are not successful until the second season.  I think the above vine was a mound that needed to be replanted.  Regardless, some mounds only have one or two vines that climb and yield is fairly low.
These cones are moist and heavy and will likely be ready in 2 weeks.
Time to fire up the dehydrator!  I need to build the box fan dehydrator I've sketched out in my mind a few years back.  If anyone wants to see how I have been dehydrating and storing my homegrown hops, click here for dehydrating hops or storing hops.  Cheers!

Sunday, July 12, 2009

Hop Farm July 12 2009 Part 1

First harvest today! Michelle and I picked the Chinook and Centennial. We only picked the ready hops to half-fill two paper grocery bags. There's plenty more on the way. The magnum is doing well though 2 out of 5 mounds were ravaged by prohibition rabbits. Last, the vojvodina is a bit slow this year and just started budding.

Hop Farm July 12 2009 Part 2

Here's a look at the second wave of hop flowers coming in. As in the past, the second harvest has very dense clusters with the Chinook plants.

Monday, July 28, 2008

Hop Farm, July 28 2008

Harvest Time!
We were at the hop farm this weekend for my wife's PhD party when I noticed that several vines are ready for harvesting. Actually, there were more hops ready than I can possibly handle to process. Next year, I simply have to make a large dehydrator. Today we picked about a pound or so of chinook and centennial hops (that's what it will amount to after dehydration).
Here's the current view of the farm. All but one mound has grown (the bottom row chinook that was torn up by rabbits). Magnum, as usual has just started cone production. Though the top row centennial had trouble getting started this year, its counter part on the bottom row is nearly ready for harvest. I picked all I could from the top row which was completely ready.
Of course, its always nice to have help. My wife, Dr. Michelle, and Dr. Courtney (I don't think I could have found smarter assistants!) helped pick the chinook. There were so many to pick that I had to tell them to stop. Our dehydrator can only hold so much and while I can lay out hops on tables in the house to start drying, we're leaving for Hawaii on Friday. I want to make sure everything is dehydrated and vacuum sealed by then.
Above is a view of the top wire chinook. A few weeks ago, these were just getting started. The density is likely attributed to a good watering schedule and a good manure base at the season start.
I'm always impressed with the size of the chinook hops we grow. They are large, healthy, and very abundant. Also, their stability for storage is amazing. In the background are the hops that didn't fit in the dehydrator. They'll need to wait for about 48 hours before being moved to dehydrator.
Here's one of the bigger of the chinook cones. In my last blog, people wanted to know if I had small hands. Very good question since it seems unlikely to have a hop cone the length of any finger. I wouldn't call my hands small by they aren't large either. My glove size is typically small to medium.
If my hand doesn't give you a sense of how big these cones are, then perhaps this will better scale the chinook hops.
Here's the dehydrator we use. The capacity is great for its compact size. Considering that we only use it for hops, it readily fits in a cabinet for storage during the rest of the year. Though building a larger dehydrator will be very necessary next year, this works for smaller batches.
A nicer dehydrator can be a bit expensive, even for a used one on eBay. To dehydrate hops, it is very important that no heat is applied. I keep our dehydrator at 85 where it produces no heat. The only heat comes from the electrical fan in operation. I feel like I've posted all these details in my last blog, dejavu! This dehydrator has settings for other applications but we only used it for hops.
Above you can see the four racks in the dehydrator. Next harvest, I'll show how much surface area this particular model has. I think the racks are 1 foot by 1 foot but they might be a bit bigger. Straight off the vine, hops typically need about 48 hours. The hops on the table will only need about 24 hours.

Saturday, March 22, 2008

Planting Chinook Hops

Hop rhizomes are planted in mounds raised above the soil surface. They only need about 1 inch of topsoil above them. The soil at the hop farm is not the greatest but with a small amount of fertilizer or mulch, the hops do just fine.
Sent from my mobile phone.