Friday, August 13, 2010

Classic American Pilsner

Here's a style I've never brewed before and have only had one example of from Lighting Brewery, their Ionizer Lager.  Lightning's brewer, Jim Crute, brought this lager to one of our QUAFF meetings quite some time ago and brewing a similar beer was since slated on my to-do list.  Ionizer Lager is a bit out of style for a Classic American Pilsner and so is this recipe.  Instead of sticking with either corn or rice, I decided to use both (simply out of excitement).  Like Ionizer, I also decided to exceed the defined limit of a 6% ABV to shoot for something a bit more on the stronger side.

Classic American Pilsner, August 12 2010
BJCP Category 2C. Classic American Pilsner
5 Gallons, Grain/Extract, Single Infusion Mash, 90 Minute Boil

4 lbs. Domestic 2-Row
3 lbs. German Pilsner
3 lbs. Flaked Maize

30 Minute Corn Steep at 160°F
90 Minute Single Infusion Mash 148°F

1 lb. Dried Rice Extract

1 oz. Northern Brewer 8.8% 60 min.
1 Whirlfloc tab 20 min.

White Labs WLP830 German Lager Yeast (thanks, Kara!), Vial to 900ml Starter
Fermented at 52°F primary for over 2 weeks then racked to secondary (with a diacetyl rest) for another 3 weeks before stepping down to 40°F for lagering.

OG: 1.060 @ 76°F
FG: 1.009 @ 44°F
ABV: 7.1%

Tapped and bottled out a few on 10/21.  Very clean tasting with subtle hints of corn, mostly dry.  Hops are nicely balanced and the increased ABV is hidden fairly well.

Evaluation: I brought this beer to QUAFF's evaluation panel on November 17th. Clarity was brilliant and many thought the flavor was great.  Harold suggested to try a cereal mash with corn meal to truly achieve the aroma and flavor profile that is often a signature of the style.

Thursday, August 12, 2010

Dehydrating-damos Hop Oast

With the volume of hops I've been growing these days, I've long been needing a better system for dehydrating larger volumes of freshly picked hops.  According to Wikipedia, freshly picked hops can have a moisture content of 80%.  Prior to modern methods of dehydrating and making pellet hops, growers built a hop oast house to remove moisture from whole hops.  The purpose of the oast was to take the moisture content down to about 6%.  Without dehydrating, hops can quickly turn brown and eventually spoil.  You could potentially refrigerate or freeze wet hops but the moisture content can significantly shorten storage longevity.   Some like to use wet hops for brewing or dry-hopping but I  find this imparts vegetable-like flavors and aromas.

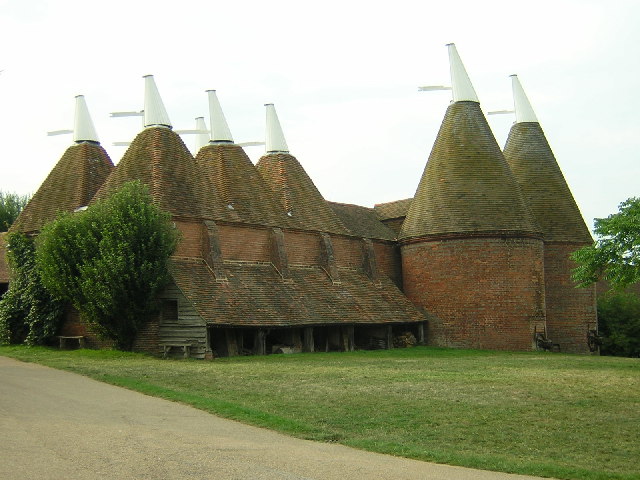
Sissinghurst Oast House in Southeast England (source below)
Oast houses had several perforated floors where hops were spread out.  At the bottom of the oast house was a kiln that applied heat through the hop laden floors.  Moisture escaped out those chimney-like rooftops.

My Former System for Dehydrating Hops
Ever since I've been growing hops, I used a common household dehydrator to do the bulk of the work.  Unfortunately, I could only dehydrate 4 square feet of hops at a time.  Considering the volume that we have typically picked off the vines at our hop farm, this simply was not enough space.
Former household dehydrator used to dry hops.
Every time we picked hops, it was always enough to fill two of these dehydrators.  We only have one!  The excess was spread out on a table at our apartment or house on paper towels.  We also turned on a fan to keep the air moving across the surface of the table.  When the hops were finished in the dehydrator (typically about 48 hours), we would transfer the table hops to the dehydrator to finish them (another 24 hours).
Dehydrating hops on a table in our old apartment.
Obviously this method of drying hops, though doable, wasn't very practical.  It limited us to how much hops we can truly pick, lengthened the time and work needed, consumed living space, and overall unchillindamos.  It did, however, make the house very aromatic.  If you want to live in an IPA, this is the way to do it!

Building a Hop Oast
The idea for the new Dehydrating-damos Hop Oast came from Food Network's show "Good Eats" hosted by Alton Brown.  The segment on the show is embedded below for you to see.  Basically, he uses common household furnace filters and a box fan to dehydrate meat and make beef jerky.

Last year, I acquired a box fan that a friend was planning on getting rid of with the intention of building a similar dehydrator for hops, the Chillindamos Dehydrating-damos Hop Oast.
The newly built oast hop tray frame.
I purchased some nicer lumber that has been sanded and has round edges (let me know if anyone wants specifics here).  Round edges make it easier when stretching the screen material.  I sized pieces to the box fan's dimensions. 
Hop oast tray frame, simple construction.
There's no need to do anything fancy.  The frame for each of the hop oast trays were built using a hand saw, nails, and wood glue.
Screen material stapled to the hop oast tray frame.
In the screen door section of the hardware store I found this heavy duty plastic-like screening that would work just right.  I used a staple gun with 1/4" staples.
Screening material stretched and stapled on the sides of the oast tray frame.
The trick to a nice taut screen is to start in the center and work your way to the corners, rotating sides each time.  This is the same technique painters use when stretching canvas on a frame.  It also works best if you have help to pull while you staple (thanks Michelle).

Dehydrating-damos Hop Oast
Building four trays and screening three of them for the latest harvest took under two hours.  After, it was a matter of dumping hops in the trays, spreading them out, stacking, and applying the box fan.
Hops dump easily into the hop oast trays.
While the heavily loaded top tray dehydrated in less than 48 hours, I plan to add two more trays (for a total of 6) to decrease the density of hops per tray, encouraging a more effective flow of air.
Hop oast trays stacked easily.
Similar to Alton Brown's dehydrator, the trays are stacked and a box fan is used to keep air flowing around the hops.  From now on, I will dehydrate my hops in the garage considering that its a dry warm environment and away from our usable living space in our house.
Box fan blows air down through the oast trays.
The trays are not directly on the garage floor, I used some wood scraps to put underneath the stack of trays.  This allows air flow to exit out the bottom.  I put the box fan on top of the trays to blow air down.  Even with one of the trays packed tight with hops, air seemed to readily flow out the bottom of the stack.  For the past two harvests, I've only kept the box fan on its lowest speed and the hops were dehydrated in less than a day and a half or about 36 hours.  (I'm thinking that if I decrease the density of the hops in each tray, I might get this process under 24 hours.)
Dehydrated hops are light and papery.
36 hours later, I opened the garage door with aromas of chinook and centennial pouring out.  The hops are light and paper-like, ready for long-term storage prep by vacuum sealing and freezing.  The trays are very easy to carry the hops to the kitchen and to shake clean.  If you need a cheap and simple system to dry a decent volume of homegrown hops, this is working out very well for me.  Let me know if you have any comments or questions!  Cheers.
More Hops = More Chillindamos
Image Source: 
Bishop, Rob. Sissinghurst Oast House. Digital image. Geograph, Sissinghurst Oast House. Geograph Britain and Ireland, 18 Feb. 2006. Web. 12 Aug. 2010. .

Wednesday, August 11, 2010

German Pils, August 11 2010

I'm a huge fan of German Pilseners.  This is one style that I simply have to brew it the way I want it.  The ABV of this brew will exceed the style limits for sure and I'm pretty sure I'll hit the upper limits or higher in IBUs.   Cause that's the way, uh huh uh huh, I like it!
The great part about brewing a pilsener is its simplicity.  German Pilsner malt and some noble hops is all it takes.  Despite the basic ingredients, there's lots of variety out there.  Some pilsners are light and sweet while others can be very dry and hoppy.  Some great pilsners I've had are Bitburger, Warsteiner, and Spaten Pils.  In the recent spirit of doing "research", I picked up a couple of new pilsners to try.
The first is from Allgäuer Brauhaus, their Teutsch Pils.  Allgäuer Brauhaus is in Southern Germany and so it was expected to be small in the hop department (Pilsners, I've read, tend to get drier and hoppier to the north).  I forgot to take a snapshot of the poured beers this round but the Teutsch Pils was golden pale in color with little head retention.  It was more malty than dry and had a light yet balanced hop bitterness and flavor.
Allgäuer Brauhaus Teutsch Pils from Southern Germany.
I'm digging on these German bottle neck labels!
Gotta sport the Reinheitsgebot.
The other pils I picked up was brewed by König Ludwig in Bulgaria. Their Kaltenberg Pils was much more of a Bavarian Pilsener style with a sweeter malt flavor and bigger body.  Hop bittering seemed very low and only subtle in the aroma and flavor.
Tasting these more uncommon bottles makes me wonder how fresh these beers truly are.  I couldn't find this particular label on the König Ludwig's website so this must be adapted or relabeled for export.  It might be time to consider a beer-cation to drink these European gems at their source.
König Ludwig's Kaltenberg Pils from Bulgaria.
König Ludwig uses more of a standard neck label.
German Pilsener, August 11 2010
BJCP Category 2A. German Pilsener (Pils)
5 Gallons, All Grain, Single Infusion Mash, 90 Minute Boil

11 lbs. German Pilsner

90 Minute Single Infusion Mash 148°F

0.65 oz. Magnum 60 min.
0.5 oz. Saaz 30 min.
0.5 oz. Spalt 20 min.
1 Whirlfloc tab 20 min.
0.35 oz. Tettnanger 10 min.
0.25 oz. Saaz 1 min.

White Labs WLP830 German Lager Yeast (thanks, Kara!), Vial to 900ml Starter

OG: 1.063 @ 73°F
FG: 1.010 @ 46°F
ABV: 7.3%

Update 8/26: Racked to secondary.  Current gravity is 1.013 @ 75°F (diacetyl rest).  It will be a couple of weeks until I start lagering.

Evaluation: I took this beer to QUAFF's evaluation panel on November 17th.  I poured this towards the end of the evening so the panel was a bit spent.  While the malt profile was there, it was the hops that needed to go bigger.  I don't think I mentioned gravities and the ABV because those are a tad high as well.  A word of caution was discussed about using Magnum for bittering since its easy to overdo the bittering.  We also talked about loading more noble hops at the end of the hopping schedule.

Tuesday, August 10, 2010

Munich Helles, 8-9-10

Ahhh, helles yeah!  Time to break-in our new Lager Cave with a number of brews where chillindamos is a necessity.  I'm stocked in German malts and hops right now and would like to get 6 lagers underway by the end of the month.  I'm hoping to use September as a lagering month with kegging and dispensing ready for Oktoberfest.  I've never brewed this style before but got a fairly decent scope of the beer design from some reading and a focused podcast on the style (The Jamil Show - Munich Helles).
As with any new brewing adventures, I like to do thorough "research".  I picked up a couple of commercial examples of the style and damn, this beer is awesome.  I could truly drink Munich Helles all day!  The bready, toasty, malt profile is just my thing.  The flavor is balanced with a nice noble hop bittering and subtle flavor.  It dries gently, demanding your palette to beg for more.  Dangerously, I can drink lots of this and that's probably why the German's drink this beer style by the liter.  I first had the Weihenstephaner, their Original Premium.  They claim to be the world's oldest brewery with a date on the bottle "Siet 1040".  Obviously, they had plenty of time to perfect this brew.
Weihenstephaner Original Premium, a commercial example of Munich Helles.
Weihenstephaner, the world's oldest brewery, since 1040.
Weihenstephaner Original Premium Munich Helles.  Awesome looking beer! Not all fizzy-yellow-stuff is bad.
I also had a Paulaner Original Munich.  Paulaner and Spaten both claim the title to have brewed the first lagers.  The profile of this beer was similar to that of the Weihenstephaner though more focused on the slightly sweet pilsner malt flavors.  Very balanced and extremely drinkable.  I certainly enjoyed the Weihenstephaner more but would readily go through a few liters of either of these fantastic brews.

Paulaner Original Munich, a commercial example of Munich Helles.
I'm digging the neck labels of these two beers.  Their shapes are similar.  Any reason?

Another great looking Munich Helles, Paulaner Original Munich.

Munich Helles, 8-9-10
BJCP Category 1D. Munich Helles
5 Gallons, All Grain, Single Infusion Mash, 90 Minute Boil

9 lbs. German Pilsner
0.75 lbs. Munich
2 oz. Melanoidin

90 Minute Single Infusion Mash 150°F

1.35 oz. Hallertauer 60 min.
1 Whirlfloc tab 20 min.

White Labs WLP830 German Lager Yeast (thanks, Kara!), Vial to 900ml Starter
Primary Ferment at 52°F

OG: 1.050 @ 68°F
FG: 1.010 @ 46°F
ABV: 5.5% (temperature corrected)

Update 8/24: Racked to secondary.  Current gravity is 1.0105 @ 71°F (diacetyl rest).   Lagering will begin in a couple of weeks.

Evaluation: I took this to QUAFF's evaluation panel on November 17th.  Of the 5 beers I brought for feedback, this one seemed to be the best example of the style.  Harold searched for signs of improvement but only suggested to re-brew this in January for NHC first round.  That was good news to hear!

Saturday, August 7, 2010

American Barley Wine, August 6 2010

Challenges of Brewing BIG Beer
While most of my brews are fairly moderate in alcohol (6-8%), I tend to stray away from big beers for a handful of reasons: mash tun size, expensive ingredient list, and its difficult to achieve a balanced beer.

Big Beers Necessitate a Large Mash Tun
My mash tun simply can't handle the quantity of grain needed to brew an alcoholic monster.   My current mash tun uses a 5 gallon Rubbermaid Water Cooler and I know they also come in 7 and 10 gallon sizes.  I could easily upgrade just my mash tun to accommodate larger grain bills. As far as fitting a false bottom to a new mash tun, those come in a number of sizes as well.  Northern Brewer carries a number of False Bottom sizes and types.  MoreBeer also has a decent collection of False Bottoms.  Making 5 gallons of strong ale styles such as barley wines needs about 20-30 lbs. of grain.  I find that my 5 gallon cooler is maxed out at 15 pounds of grain.  Potentially, I could squeeze in a few more pounds at the expense of potentially losing yield but I like to keep the mash bed light and fluffy during sparging (see images below).  I can either find a larger solution or just hold out a bit longer to upgrade to a brewing sculpture with a double sized mash tun.  My vote is for the later!
5 Gallon Rubbermaid Water Cooler holding just over 15 lbs. of mash during vorlauf.
Just enough room to use a Phil's Sparger, my 5 gallon mash tun seems maxed out at 15 pounds of grain.
If you don't quite have the capacity to make a big gravity beer using grain, there's a couple of options for you to try.  First is to do two mashes and use only about 1/3 of your normal sparge volume.  Most of what you will collect during each mash is high gravity first runnings, or the sweetest collection of wort.  You'll get low efficiency and increase your brew day by a few hours but it works!  Second, you can just add malt extract to the kettle.  This is what I did today.  In a big beer like a barley wine, using extract to boost the gravity of your grain batch will not be noticeable in the final beer.  The downside is that extract is always damn expensive!

Big Beers are Expensive and Difficult
Making bigger beer styles is really like making two beers in one.  In doing so, you can expect to double your costs.  If you're using any quantity of extract, you can nearly triple the cost.  Compared to a basic style such as pale ale, a barley wine needs more than twice the base and specialty malts and could use 2-3 times more hops.  The goal in big beers is balance.  I find that even pro brewers have difficulty finding balance in their bigger beers.  Balancing alcohol with the right amount of residual malt sweetness, bitterness, and hop flavor is very challenging.  You need to plan for more than just the final bottled or kegged beer; planning for profile changes during longer-term storage should also be a  consideration.  Knowing how your beer is going to change over 6 months to 3 years adds another level of complexity.
Fermentation and attenuation can also be problematic.  With a large fermentation task at hand, big beers require lots of attention to yeast.  This means a large pitching rate of healthy yeast, well oxygenated wort, and maintaining steady fermentation temperatures.  Worse case scenario, your yeast craps out and you get a stuck fermentation leaving you with a sweet, partially fermented, beer that will just make you cry.  For the level of cost investment and time needed to mature a big beer, its a science and an art to get good results with high gravity brewing.
Time to flush all that worry out with a good beer and chillindamos.  Every new brewing adventure mandates some "research".  One of the best Barley Wines I've had recently was made by Alaskan Brewing Company.  I had their 2009 Alaskan Barley Wine Ale this past winter.  Thought I would age this bottle for a year but made the mistake of not hiding it!  Earlier this week, I was in San Francisco and toured Anchor Brewing Company (more on that later).  I had their Old Foghorn Ale which was also a great barley wine.
2009 Alaskan Barley Wine Ale
American Barley Wine, August 6 2010
BJCP Category 19C. American Barley Wine
5 Gallons, Grain and Extract, Single Infusion Mash, 90 Minute Boil

12.5 lbs. Domestic Pale 2-Row
1 lb. Crystal 60
10.3 oz. Red Wheat
8 oz. Caravienne
5.25 oz. Crystal 20
2 oz. Chocolate

90 Minute Single Infusion Mash *152°F
*difficult to keep temps consistent in the mash tun with this much grain so a little over half of the bed sat at the warmest of 152°F while the coolest layer (top) rested at 148°F

5.2 lbs. Liquid Malt Extract added to the kettle

1 oz. Simcoe 60 min.
1 oz. Simcoe 40 min.
1 Whirlfloc tab 20 min.
1 oz. Amarillo 20 min.
0.9 oz. Homegrown Chinook 10 min.
0.75 oz. Homegrown Centennial 10 min.

Dry Hop: 0.65 oz. Amarillo

Racked on yeast bed of Flanders Brown Ale/Oud Bruin using White Labs WLP001 California Ale Yeast

OG: 1.105 @ 68°F
FG:1.020 @ 66°F
ABV: 11.3%

Update 8/26: Racked to secondary.  Current gravity is 1.018 @ 75°F.   Added dry hop.

Update 11/7: Racked to 3 gallon tertiary on 1oz. American Oak Chips.  Other 2 gallons went in a keg for carbonation to be bottled on 11/11.  I will be submitting a bottle of this to our Club Only Strong Ale competition.  Tasting the hydrometer sample was very promising.  The oaked split will sit for another month before bottling that portion.  I plan to submit that to the Wood Aged Competition next year (two beers with one brew!).

Update 11/27: This beer won 1st place in our club-only strong ale competition.  Shipping out for the AHA Club-Only competition hosted by Greater Everett Brewers League in Washington.