Friday, December 31, 2010

Happy Brew Year's

Happy Brew Year's!
2010 was a great year of homebrewing.  My primary focus was brewing to style and in doing so, I certainly expanded my brewing horizons.  Previously, I typically brewed to my heart's content.  My recipe formulation followed only rough parameters, inspired mostly by my current stock of ingredients.  Using the BJCP guidelines, I have tried to stay within target of a particular style.  Another goal was to begin participating in evaluations and competitions to gain honest feedback.  This past year, I entered a few beers in competition and sought out evaluations of my homebrew.  Honest and experienced feedback has been critical to developing my craft.
Speaking of competition!  Up until this fall, I was hoping to unleash a large handful of beers in this coming year's competition season, mostly our club-sponsored AFC competition and NHC.  With my wife's company shutting down and a little brewer on the way (end of March), we have since had to eliminate any unnecessary expenses.  Unfortunately, this means no competition entries this year.  We simply can't justify $10-$15 entry fees.  Bummer, huh?  Homebrewing on the other hand is decidedly cheaper than purchasing one of the household staples, beer.  Despite rough times, I'm just lucky to continue brewing to some extent!
Our latest "brew".  Some say it looks like he already has a beer in hand.
The New Year's brings resolutions and I have a two to address.  The first being to adjust brewing water.  At over 90% of beer volume, water takes a primary role.  The last time I considered adjusting my brewing water, I think I simply focused on the fact that many good homebrewers and some pro brewers use only their local tap water.  I've always filtered my water but haven't considered the rest of the details.  The second resolution is using brewing software.  I decided to start using Beer Tools.  I would have considered ProMash or Beer Smith and actually downloaded their trials.  I use a desktop Mac at home for all of my homebrewing digital needs: research, brewing related email, images, beer labels, calculations, blogging, and now Twitter.  Since Beer Tools is the only choice on a Mac, it was a no brainer.

My Brew Year's Resolution: Brewing Water and Software
Brew Year's Resolution #1 - Adjust Brewing Water
After 10 years of homebrewing, considering water critically as a brewing ingredient is long overdue. At this point, I'm in the research phase.  I've asked my homebrew club's email listserv to see if there's a definitive guide for adjusting water.  This simple answer was, no.  Adjusting brewing water seems to have the same range of involvement as brewing beer itself.  You can simply use tap water (or a homebrew kit) or become insanely involved.  As a science teacher with some background in chemistry, how hard can it be!?  Here's the collection of links from my QUAFF buddies:

John Palmer's How to Brew Chapter 15 - Understanding the Mash pH
Chapter 15.0 - What Kind of Water Do I Need? Chapter 15.1 - Reading a Water Report Chapter 15.2 - Balancing the Malts and Minerals Chapter 15.3 - Residual Alkalinity and Mash pH Chapter 15.4 - Using Salts for Brewing Water Adjustment

From Kai at BrauKaiser.com - Various Water Recipes - Beer color, alkalinity, and mash pH - effect off water and grist on mash pH (PDF)
Thanks Joe!

Another QUAFF member, Kim, wrote an interesting reply that I will simply quote:
Hi Sean,

I think John Palmer's How To Brew 3rd ed, chapter 15 is a great starting point for water chemistry.

In addition to Joe's links, AJ Delange has a site with a lot of technical depth (and things about Newfoundland dogs)
http://ajdel.wetnewf.org:81/ His spreadsheet is a beast! It has a 66 page users' manual for how to use it! (No, I haven't read it all.) Presumably a lot of that is theory... The alkalinity and water recipe documents may be of interest, and there are other goodies in there too.

AJ also contributes a lot on the brewnetwork's forums, especially with respect to water. Here's a (very!) recent thread about errors in John Palmer's water spreadsheet, but also about how it's not as disastrous as the bad math makes it seem: http://www.thebrewingnetwork.com/forum/viewtopic.php?f=6&t=23205 I'm hoping that the math/chemistry in the book is just fine, and that the errors are really in the formulas in the spreadsheet.

As far as I can tell, there isn't a single definitive resource for water chemistry. The lesson I get form it is that there are general correlations in the amounts of our brewing ions and the outcomes, but it's not as cut-and-dried as the formulas indicate. For example, 20ppm sulfate to 10 ppm chloride won't have the same effect as 200ppm to 100ppm. And Kai "Braukaiser" Troester's research (Joe linked to it) indicates that pound-for-pound, crystal malts actually acidify the
mash more than roasted malts, the opposite of what I had learned. You know, Dublin's classic style is stout, with generous use of roasted malts to counter the high carbonate water. Still, they are good starting points for later tweaking, just like pretty much everything else in brewing ;)

Cheers,
Kim
4-Part Podcast on Brewing Water:

On the Brewing Network, the podcast show, Brew Strong, has a four-part series on brewing water.  If you're a beer-brewing geek and haven't already found Jamil and John's awesome Brew Strong podcasts, I'd highly recommend subscribing and perusing the archives.  I've found that these podcasts are a go-to resource for exploring different aspects of brewing beer.  Here's the link to subscribe to the Brew Strong podcasts.
Another QUAFF buddy, Brian, reminded me of this "Waterganza" series on Brew Strong:
Podcast 1 - Why Adjust Your Water - Podcast 2 - How to Adjust Your Water - Podcast 3 - Adjusting Water to Styles - Podcast 4 - The Final Answers


While I'm hoping that Beer Tools will have some practical calculations or at least have the ability to document brewing water adjustments, it seems there's a good spreadsheet available that's based on John Palmer's brewing water calculations.  There's a link to the spreadsheet on the forums over at Homebrew Talk.  I know at least two other members in my homebrew club use this spreadsheet. Here it is:  EZ Water Adjustment spreadsheet

Last, I'm wondering if anyone has tested our local water.  A few searches led me to a lab that can do water analysis.

Brew Year's Resolution #2 - Brewing Software
As for my other Brew Year's Resolution, Beer Tools it is!  There's some users out there that have described it as a steeper learning curve than ProMash or Beer Smith but have also explained its utility as an equivalent for brewing software.
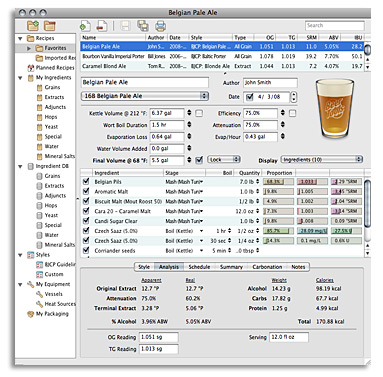
Beer Tools Software
Beer Tools had an end-of-year deal to those that signed-up for the 30-Day Trial.  That seemed to seal the deal!  Here's a link to their Overview of Beer Tools Pro 1.5.

I will certainly outline my adventures in brewing water and using Beer Tools here throughout the year.  Homebrewing has been, at foremost, a hobby.  For a handful of us, its an obsession.  I dream in homebrew!  Cheers to all and Happy Brew Year's!

Thursday, November 25, 2010

Smoked Porter, November 23, 2010

I've brewed up a couple of Smoked Porters earlier this year with great success.  The first was an Agave Smoked Porter utilizing the agave as an adjunct, great beer.  The second time, I tried a different approach on Smoked Porter with fantastic results.  Although I felt the second beer was nearly my ideal Smoked Porter, I changed it up based on my current holdings.  As with many beers, recipe formulation is often limited to what's in stock at home and/or what's available at my local homebrew store.  The one element we didn't like from the last Smoked Porter was the flavor profile imparted by the yeast, WLP007 Dry English Ale.  In my opinion, you simply can't go wrong with WLP001 California Ale and I always feel that most ale recipes need a try with this strain (here's just another good reason I'd like to upgrade to a 10 gallon system, experimenting side-by-side [same wort split into two carboys each fermenting with different yeast strains] would be insanely fun!).
As far as competition is concerned, luckily I don't really need to follow any specific guidelines.  Quoted below is the category guidelines for smoked beer.  Since this homebrew recipe does not follow any classic styles, I can easily blanket the underlying style as a "Porter".
IF THIS BEER IS BASED ON A CLASSIC STYLE (E.G., ROBUST PORTER) THEN THE SPECIFIC STYLE MUST BE SPECIFIED. CLASSIC STYLES DO NOT HAVE TO BE CITED (E.G., “PORTER” OR “BROWN ALE” IS ACCEPTABLE). THE TYPE OF WOOD OR OTHER SOURCE OF SMOKE MUST BE SPECIFIED IF A “VARIETAL” CHARACTER IS NOTICEABLE.

On another note, I've been having a great time utilizing the Wort Chiller with Recirculation Combination.  With cooler weather in San Diego, there has also been a significant drop in tap water temperatures.  Today, I was able to reduce a boiling wort to 63°F in 20 minutes using slightly less than 20 gallons of water (I use this hot/warm/cool effluent for washing and rinsing).  At the end of chilling, I pump out the wort rather quickly to a carboy.  Check it:
After chillindamos, the March Pump and recirculation arm quickly transfer the wort to a carboy.

Pumping wort is not only fast, it seems to do a fairly decent job of aerating as well.

Smoked Porter
BJCP 22B. Other Smoked Beer
5 Gallons, All Grain, Single Infusion Mash, 90 Minute Boil

9 lbs. Domestic 2-Row
2 lbs. Red Wheat
2 lbs. German Rauch Malt
0.7 lbs. UK Chocolate Malt
0.75 lbs. Crystal 20
0.25 lbs. Crystal 60
4.5 oz. Carafa II
2.5 oz. Dark British Crystal

Single Infusion Mash
(1 qt./lb. raised to 167°F)
Saccharification Rest at 148-150°F for 70 minutes
Fly-sparged 5.5 gallons at 170°F

1.5 oz. Homegrown Chinook 60 min.
0.75 oz. Spalt 20 min.
1 Whirlfloc Tab 20 min.
0.5 oz. Spalt 10 min.

White Labs WLP001 California Ale Yeast   2 vials (thanks Kara)

OG: 1.063 @ 62°F
FG: 1.013 @ 66°F
ABV: 6.7%

Blueberry Wheat, November 20, 2010

I know what you're thinking, Blueberry?  Really?  Let me tell you.  This beer is the gateway homebrew for so many of my friends.  It leads to more drunkeness and debauchery than any other of my brews.  Really.
This is my classic Blueberry Wheat.  Very simple recipe and a huge crowd pleaser.  I've tried a few other fruity combinations but this is the true winner.  It is requested every year for our New Year's Bash up in Big Bear and certainly fuels our annual Winter Games.
Andrew floats blueberries on the top of last year's Blueberry Wheat.
This time I followed some advice and it seemed to potentially have a negative effect (I'm probably overreacting).  Of course, this is my perception on original gravity only (1.050 vs. previous 1.058-1.060) but typically there are many other variables that could have contributed to a change.  One variable is that I used Red Wheat malt instead of White Wheat (probably very minor).  This was simply a matter of availability at my local homebrew supplier.  The difference of their effect in the mash tun is likely small since they seem to be identical malts in so many ways. Anyone got a maltster profile of these two wheat malts?
My underline issue here is consistency.  I believe this is the ONLY brew I've ever made more than twice.  Getting more than one gravity result (again, 1.050 vs. previous batches 1.058-1.060) makes you realize how much each beer brewed depends on the execution of a specific process.  Also, you have to accept that ingredients may also change, even year to year.  On my equipment, I know there's a great deal of human variability (another argument to get a brew sculpture with more control over the process, any sponsors?).  While a change in ingredients is the first major variable, I decided to reduce my mash time to 60 minutes from a suggestion by Harold during a beer evaluation session.  While the evaluation committee didn't evaluate this particular beer, Harold discussed the importance of not extending the mash time to 90 minutes.
Why change a thing that's worked really well in the past?  Well, I can't tell what affected my gravity target: malt or a change in mash times. Of course, there can be other variables in play that are not quite as obvious.  Many of us homebrewers evolve our process over time.  I am likely not the same brewer I was when this beer was last made.
So here's the big question: 60 minute single infusion or 90 minutes?  I've previously heard and read that 90 minutes is essential to ensure a full conversion and others have been convincing that time beyond 60 minutes can break down essential final products (don't remember their specifics here).  In a month, I'll have the verdict whether or not this basic grain bill has an improved flavor and body profile at the expense of potential alcohol.  I would be interested in doing a full experiment but that's hard to do without good controls (again, any takers?).  I doubt the guy below has an answer, anyone else?
Saw this guy in SF.  He's got it wrong, should read, "Why lie, I need a homebrew".
Blueberry Wheat
BJCP Category 20. Fruit Beet
5 Gallons, All Grain, Single Infusion Mash, 90 Minute Boil

7 lbs. Red Wheat
4 lbs. Domestic 2-Row

Single Infusion Mash
(1 qt./lb. raised to 167°F)
Saccharification Rest at 148°F for 70 minutes
Fly-sparged 5.5 gallons at 170°F

1 oz. Hallertauer 60 min.

White Labs WLP001 California Ale Yeast   2 vials (thanks Kara)

2 oz. Blueberry Flavoring added at kegging

OG: 1.050 @ 68°F
FG: 1.006 @ 66°F
ABV: 5.9%

Monday, November 15, 2010

Doppelbock, November 14 2010

Contemplating the frustration of having limitations with my mash tun, it occurred to me that I really don't need to make 5 gallons every time I brew (what I really want is 10).  I decided to give a try making a 4 gallon batch with a reasonable capacity of about 13.5 pounds.  A grain bill that size is easy enough to manage (stirring without spilling all over the place) but is about a pound or so too big for a multi-infusion mash. I'll opt for a single-infusion to see what's possible with a lower final yield.  Turns out that I'm just within the Doppelbock range of starting gravities (1.072-1.112) with this brew.  I figured that if I missed the mark, I would still have a Traditional Bock.
13.5 lbs. of grain in a 5-gallon Rubbermaid cooler is easy to work with.

After adding today's batch, looks like plenty of room for 2 more primaries.


Doppelbock
BJCP Category 5C. Doppelbock
4 Gallons, All Grain, Single Infusion Mash, 90 Minute Boil

5.2 lbs. Vienna
5 lbs. Belgian Pilsner
1.2 lbs. Munich
1 lb. Caramunich
1 lb. Caravienne
1 oz. Dark British Crystal
1 oz. Melanoidan
1 oz. Carafa II

Single Infusion Mash
(1 qt./lb. raised to 168°F)
Saccharification Rest at 152°F for 70 minutes
Fly-sparged 4.5 gallons at 170°F

1 oz. Tettnanger 60 min.
0.5 oz. Spalt 20 min.
1 Whirlfloc tab 15 min.

White Labs WLP830 German Lager Yeast   200ml of leftover slurry from previous week's brewing
Currently in ferment at 52°Fin the Lager Cave

OG: 1.076 @ 68°F
FG: 1.022 @ 39°F
ABV: 7.3%

Thursday, November 11, 2010

German Bock, November 11, 2010

I've avoided this style considering that its on the secondary brewing list planned for lagers to be ready for Oktoberfest (priorities are typically Oktoberfest, Pilsner, Helles, and a Vienna or amber-like lager) and two, bock requires a large grain bill, beyond my mash tun's capacity.  The Lager Cave has eliminated the first barricade and with a 15 lb. limit tested during the Barley Wine brew, it was worth the shot to try to hit the target original gravity of Traditional Bock.  I settled for a grain bill of 14.5 lbs. which eliminated any possibility of doing a multi-step infusion mash.  Just 1/2 pound more and my 5-gallon Rubbermaid mash tun is busting out its plastic seams.
14.5 lbs. has its toll but at least its manageable.
After the brew day, we drove the bock over to the Lager Cave at Ed's and as you can see below, there's still room to spare (hmm, what to brew next!?).
The Lager Cave has insane space!
German Bock
BJCP Category 5B. Traditional Bock
5 Gallons, All Grain, Single Infusion Mash, 90 Minute Boil

9 lbs. Munich
4 lbs. Belgian Pilsner
12 oz. Caramunich
4 oz. Dark British Crystal
4 oz. Caravienne
4 oz. Melanoidan

Single Infusion Mash
(0.95 qts/lb. raised to 166°F)
Saccharification Rest at 148°F for 60 minutes
Fly-sparged 5.75 gallons at 170°F

0.45 oz. Magnum 60 min.
1 Whirlfloc tab 15 min.

Combination of 135ml of White Labs WLP833 German Bock Lager Yeast and 50 ml
White Labs WLP830 German Lager Yeast   (Fresh slurry thanks to Kara!)
Currently in ferment at 52°F

OG: 1.062 @ 70°F
FG: 1.015 @ 38°F
ABV: 6.5%

Reminder: Glass Breaks!

Who wants some!?

Luckily, no one was hurt during this mishap.  It does, however, remind me that I should warn all who come over to help with brewing that glass carboys are extremely dangerous.  I should always tell a few stories of  severed toes, explosive impaling shards, and the worst - spilled beer.  While we didn't experience any of that, knock knock, the truth is that many have.  Time to replace the fermentation fleet with Better Bottles!  On the lighter side, we were able to take this image of Andrew, clearly threatening! As for Matty, sorry I didn't tell you those stories first!

Sunday, November 7, 2010

Vienna Lager, November 7, 2010

The last Vienna Lager I made was great!   I also brewed up an interesting Vienna Agave Lager last year that was well received.  I'm hoping that this beer will be an instant hit with our New Year's party crowd and I'd like to bottle out some for evaluation.
On another note, I'm still dialing in the recirculation immersion wort chiller.  The biggest problem was with the Quick Disconnects (QDs) which were clogging the pump system.  In both sides of the QD components, a cross-hair structure would collect hop matter and slow the March pump to a trickle. 
QD's for the March Pump.
Shown is the tubing end of the QD but there's also two other components that are attached to the pump. They also have the same structure imposing on the flow.  A total of four blocking points have been reeking havoc on the recirculation flow during wort chilling.  Using a Dremel tool, I drilled and sanded out all four flow restrictions.
Left QD shows the original "hop blocker".  Right, rough drilling.
After cleaning them up with a sanding bit, I could easily tell the flow rate will have significantly less interruption.  The only restriction points are now the 1/2" barbs.  After testing this out today, no small hop matter and trub was locked up at any point along the recirculation route.  I'm chillindamos again.
Using a dremel, both QD's are opened up for business!
The only other frustration, and restriction point, on the recirculation pump system has been with the kettle spigot.  I took the spigot over to Home Depot and Lowe's during the summer to try and find a replacement with no avail.  It seems the threading was not standard.  Larry over at Home Brew Mart and Ballast Point Brewing identified the pot with the spigot to be an Italian design with its own spec.  He suggested some options including simply taking out the spigot tip (I had managed to squeeze in a narrow barb that hasn't been working very well - the tightest restriction point at the moment) and finding some 1/2" ID tubing to stretch right over it.  We also talked about drilling a new hole and replacing the spigot.
With heat left over from the boil, the tubing molded easily to the Italian spigot.
 Since the contours of the kettle spigot are thicker on the end, the tubing seemed to create a good seal without the use of any clamps.
Tubing leaving the kettle to the March Pump.
 I thought this tubing was high temp and originally thought I might have to leave it on the kettle at all times.  I had to remove it when it started showing signs of melting, yikes!  At least I was able to cut off that section and found that it was really easy to remove and reinstall the tubing with a tight seal whenever I wanted.
Immersion Chiller combined with Wort Recirculation.
Further modifications have led to even more chillindamos!  The circulation happening in the pot was significant compared to before the dremel work and tubing makeover.  I went through even less water and reduced more time to chill the wort.   Now back to beer.

Vienna Lager
BJCP Category 3A. Vienna Lager
5 Gallons, All Grain, Step Infusion Mash, 90 Minute Boil

6 lbs. Vienna
3 lbs. Munich
3 lbs. Belgian Pilsner
4 oz. Caramunich
4 oz. Caravienne

Protein Rest at 122°F for 7 minutes
(0.9 qts/lb. raised to 135°F)
Saccharification Rest at 148°F for 60 minutes
(0.5 qts/lb. raised to 212°F)
Fly-sparged at 170°F

1.5 oz. Tettnanger 60 min.
1 Whirlfloc tab 20 min.
1 oz. Spalt 10 min.

White Labs WLP830 German Lager Yeast   (100ml of fresh slurry thanks to Kara!)
Currently in ferment at 52°F

OG: 1.053 @ 73°F
FG: 1.013 @ 40°F
ABV: 5.6%

Saturday, November 6, 2010

Schwarzbier, November 6, 2010

BLACK BEER
"Smell the Beer" in honor of Spinal Tap.
I've wanted to make a Schwarzbier for quite some time.  With the Lager Cave in full effect, how can I not brew everything and anything requiring lower fermentation temperatures?  While I've had a few Black Beers in the past, I was not quite sure where to start in recipe formulation.  My intuition told me I should make a dry stout and simply use a lager yeast instead of ale yeast.  As with several other planning sessions, I used Jamil Zainasheff's recipe as a general guideline from his book, Brewing Classic Styles.  I've found this book and Jamil's style-based podcasts a great starting point when formulating many brewing recipes and would recommend other brewers to do the same. 

Schwarzbier
BJCP Category 4C. Schwarzbier (Black Beer)
5 Gallons, All Grain, Step Infusion Mash, 90 Minute Boil

8 lbs. Beligan Pilsner
2 lbs. Munich
8 oz. Carafa II
4 oz. Caramunich
4 oz. Chocolate
2 oz. Black Roasted

Protein Rest at 122°F for 10 minutes
(0.9 qts/lb. raised to 135°F)
Saccharification Rest at 149°F for 60 minutes
(0.5 qts/lb. raised to 212°F)
Fly-sparged at 170°F

1.5 oz. Hallertauer 60 min.
1 Whirlfloc tab 22 min.
0.5 oz. Spalt 22 min.
0.7 oz. Hallertauer KO

White Labs WLP830 German Lager Yeast   (100ml Fresh slurry thanks to Kara!)
Currently in ferment at 52°F

OG: 1.052 @ 74°F
FG: 1.013 @ 40°F
ABV: 5.5%

Wednesday, October 13, 2010

East Coast Lager, 10-10-10

East Coast Lager, 10-10-10
Chillin Chillin Chillin, can't you see?  Sometimes your homebrews just hypnotize me!
Damn, busted the style guidelines again.  This lager doesn't seem to fit in any of the categories but would likely float between a Dortmunder Export and a Vienna Lager.  I'd like to call it an East Coast Lager since a like grain bill I've brewed before more resembled a Boston Lager than any of the style categories.  I have no idea what category a Sam Adams Boston Lager would even fall into (maybe a new category is needed?).  For now, I'll just blanket this in BJCP Category 3 which covers Vienna Lager and Oktoberfest.  Amber Lager is something you definitely see on tap and on the shelves around here since Karl Strauss seems to distribute this beer as their flagship.  Their Amber Lager is a crowd pleaser with its sweeter malt and low hop profile.
The East Coast Lager will be ready for our annual New Year's Big Bear Bash where I plan to have four lagers on tap.  Biggie, this one's for you!

East Coast Lager
BJCP Category 3. European Amber Lager
5 Gallons, All Grain, Step Infusion Mash, 90 Minute Boil

9.5 lbs. Beligan Pilsner
0.5 lbs. Caramunich
0.25 lbs. Crystal 20

Protein Rest at 124°F for 20 minutes
(0.9 qts/lb. raised to 135°F)
Saccharification Rest at 148°F for 60 minutes
(0.5 qts/lb. raised to 212°F)
Fly-sparged at 170°F

2 oz. Tettnanger 60 min.
1 Whirlfloc tab 15 min.
1 oz. Hallertauer 10 min.

White Labs WLP830 German Lager Yeast   (Fresh slurry thanks to Kara!)
Currently in ferment at 52°F

OG: 1.052 @ 79°F
FG: 1.011 @ 38°F
ABV: 5.9%

New Year's Pilsener, October 9 2010

SAAZ!!!
A field of dreams.

A pilsener with Magnum bittering and a flavor profile of Saaz IS where its at.  With the new Lager Cave, I can be in lager production year round.  I just pulled out 5 batches from the cave sitting at around 40°F and can now return to Saccharomyces pastorianus fermentation temperatures around 52°F.  This is simply great!  My kegerator is now full but I can still make lagers for our annual New Year's bash up at Big Bear.   Usually I brew a variety of ales to satisfy the masses but I have to admit, this one's for me!  I might just hide this in the corner for me, Kara, and other hoppy lager fiends.  SAAZ!!!

Bohemian Pilsner
BJCP Category 2B. Bohemian Pilsener
5 Gallons, All Grain, Step Infusion Mash, 90 Minute Boil

9.5 lbs. Beligan Pilsner
0.5 lbs. Vienna

Protein Rest at 124°F for 20 minutes
(0.9 qts/lb. raised to 135°F)
Saccharification Rest at 148°F for 60 minutes
(0.5 qts/lb. raised to 212°F)
Fly-sparged at 170°F

1 oz. Homegrown Magnum 60 min.
0.5 oz. Saaz 20 min.
1 Whirlfloc tab 15 min.
0.5 oz. Saaz 10 min.
0.5 oz. Saaz 5 min.
0.5 oz. Saaz 1 min.

White Labs WLP830 German Lager Yeast   (Fresh slurry thanks to Kara!)
Currently in ferment at 52°F

OG: 1.052 @ 79°F
FG: 1.008 @ 38°F
ABV: 6.3%

Image Source: 
Marti. Hopfengarten. Digital image. Http://en.wikipedia.org/wiki/Hops. Wikipedia, the Free Encyclopedia, 14 Jan. 2007. Web. 9 Oct. 2010.

Sunday, October 3, 2010

Free the Shine

Wish I could join the art.  Local distiller and brewer featured in the video.  Check it. 

Oktoberfest, August 27 2010

Oktoberfest, August 27 2010
Another year goes by and yet I don't fly.
While many homebrewers would find Belgium as a premium beercation, I would prefer an extended intoxication at Oktoberfest in Germany.   As an educator, October is not a practical time for a vacation.  The fall is typically a teacher's tax season, leaving virtually no window of opportunity for a distant beer binge.  For now, I've got to make this happen locally (always replicated and never duplicated as far as I know).  I'm running a bit late this summer but hopefully this will turn out just fine for a fine Oktoberfest brew towards Halloween time.
I changed a few aspects from last year's batch that I hope will solve some of the judging issues where the beer fell shy.  To toot my horn, last year's Oktoberfest won our club-only competition and was sent to nationals where it went to second-round.  Nationals were in the mid-west and the judging comments described the beer as being flawless but slightly lacking in a bigger malt profile and hops.  My guess, this is simply the fact of competition; you gotta make your beer stand out.  Another well established homebrewer in my club remarked that they haven't had an Oktoberfest like this since he was in Germany.  I gotta be doing something right here!

BJCP Category 3B. Oktoberfest
5 Gallons, All Grain, Step Infusion Mash, 90 Minute Boil

4 lbs. German Pilsner
5.5 lbs. Vienna
1.5 lbs. Munch
1 lb. Caramunich
0.75 lb. Caravienne
4 oz. Melanoidan

Protein Rest at 126°F for 20 minutes
Saccharification Rest at 149°F for 60 minutes
1g Calcium Carbonate added to 5 gallons of 170°F sparge water
Fly-sparged at 165°F for about 50 minutes

1 oz. Hallertauer 60 min.
1 Whirlfloc tab 20 min.
0.25 oz. Hallertauer 10 min.

White Labs WLP830 German Lager Yeast  Vial (Thanks, Kara!) to 900ml starter

Currently in ferment at 52°F

OG: 1.061 @ 68°F
FG: 1.013 @46°F
ABV: 6.5% (temperature corrected)

Image Source:
User: Senator86. Mass Krug. Digital image. Oktoberfest. Wikipedia, the Free Encyclopedia, 24 Sept. 2006. Web. 3 Oct. 2010.

Evaluation: Took this beer to the QUAFF evaluation panel last night.  It needs a bit more body to accentuate the malt profile.  It was suggested to keep the protein rest under 10 minutes to avoid the breakdown of body-building proteins.  Since my last visit with the panel, I've already employed this strategy.  

Dortmunder Export, August 24 2010

Dortmunder Export, August 24 2010
Despite the style, I'm not exporting this beer anywhere! (except maybe to my belly)
BJCP Category 1E. Dortmunder Export
5 Gallons, All Grain, Single Infusion Mash, 90 Minute Boil

7 lbs. German Pilsner
3.5 lbs. Munich
7 oz. Vienna
2 oz. Melanoidan

60 Minute Single Infusion Mash 149°F
Fly-sparged at 165°F for about 50 minutes

1.55 oz. Hallertauer 60 min.
0.5 oz. Spalt 20 min.
1 Whirlfloc tab 20 min.
1 oz. Spalt KO
Primary fermentation at 52°F  Lagering for one month at 38°F.

Racked on yeast bed of Munich Helles using White Labs WLP830 German Lager Yeast

OG: 1.058 @ 77°F
FG: 1.014 @ 46°F
ABV: 6.1% (temperature corrected)

Image Source: 
Hormats, Robert D. National Export Initiative. Digital image. National Export Initiative. US Department of State Official Blog, 17 Mar. 2010. Web. 3 Oct. 2010.  

Evaluation: I took this beer to QUAFF's evaluation panel on November 17th.  Since I poured bottles straight from draft, I believe I didn't clear out the beverage line enough (mental note) and while this beer has poured very clean for several weeks now, the most noticeable character when pouring was diacetyl.  I suspect a bit of oxygen is the cause.  Otherwise, we noted that is was under-attenuated but otherwise a fair export.

Anchor Brewing Company Tour

Early August, I did a bit of a road trip visiting friends and stopping at some locations where liquid chillindamos is made.  Amongst numerous wineries in the Russian River areas, a visit was also made to Moylan's Brewing, Russian River Brewing, and Anchor Brewing.  I love Anchor Steam.  Its been on my top 10 since I had it for the first time in the late 90's.  I really enjoy brewing the beer style, California Common, and think my interpretation holds very well in a side-by-side.  Needless to say, I was really excited to see this historic brewery.
A tour at Anchor Brewing is free but you'll need to schedule an appointment in advance.  Its fairly easy to call them and find out their availability.  I made reservation about a month out for a Tuesday morning in August. They seemed to be booked solid during the summer so plan accordingly.
Anchor Brewing houses their entire operation in this building.  Turns out that Fritz Maytag (former owner and brewmaster) had his last official day at the brewery the Friday before I was here.  Darn, it would have been great to get a picture with this brewing hero.  Our guide told us that the new owners and management arrive the following day to ensure the continuation of the Anchor tradition.
Their brewing room and tasting area are the only allowable locations to take photos but there are lots of videos out there, including ones on the Anchor Brewing website, that show what takes place beyond these images.  Their brewing system is classic and elegant.  The office space in the back houses their laboratory equipment.  I took notes on a handful of details such as the temps in their open fermentation room and the varieties spotted in the hop room.  Turns out that videos describe those details too!
The tour doesn't take long and our guide didn't flourish on any details of their quintessential California Common flagship, Anchor Steam.  I asked for lagering temps and times and even the guide wasn't aware of the details.   Last, they bring the group back to the above tasting area for some generous samples of their entire flight.

Anchor Brewing Company: A conversation with craft beer pioneer Fritz Maytag


Friday, August 13, 2010

Classic American Pilsner

Here's a style I've never brewed before and have only had one example of from Lighting Brewery, their Ionizer Lager.  Lightning's brewer, Jim Crute, brought this lager to one of our QUAFF meetings quite some time ago and brewing a similar beer was since slated on my to-do list.  Ionizer Lager is a bit out of style for a Classic American Pilsner and so is this recipe.  Instead of sticking with either corn or rice, I decided to use both (simply out of excitement).  Like Ionizer, I also decided to exceed the defined limit of a 6% ABV to shoot for something a bit more on the stronger side.

Classic American Pilsner, August 12 2010
BJCP Category 2C. Classic American Pilsner
5 Gallons, Grain/Extract, Single Infusion Mash, 90 Minute Boil

4 lbs. Domestic 2-Row
3 lbs. German Pilsner
3 lbs. Flaked Maize

30 Minute Corn Steep at 160°F
90 Minute Single Infusion Mash 148°F

1 lb. Dried Rice Extract

1 oz. Northern Brewer 8.8% 60 min.
1 Whirlfloc tab 20 min.

White Labs WLP830 German Lager Yeast (thanks, Kara!), Vial to 900ml Starter
Fermented at 52°F primary for over 2 weeks then racked to secondary (with a diacetyl rest) for another 3 weeks before stepping down to 40°F for lagering.

OG: 1.060 @ 76°F
FG: 1.009 @ 44°F
ABV: 7.1%

Tapped and bottled out a few on 10/21.  Very clean tasting with subtle hints of corn, mostly dry.  Hops are nicely balanced and the increased ABV is hidden fairly well.

Evaluation: I brought this beer to QUAFF's evaluation panel on November 17th. Clarity was brilliant and many thought the flavor was great.  Harold suggested to try a cereal mash with corn meal to truly achieve the aroma and flavor profile that is often a signature of the style.

Thursday, August 12, 2010

Dehydrating-damos Hop Oast

With the volume of hops I've been growing these days, I've long been needing a better system for dehydrating larger volumes of freshly picked hops.  According to Wikipedia, freshly picked hops can have a moisture content of 80%.  Prior to modern methods of dehydrating and making pellet hops, growers built a hop oast house to remove moisture from whole hops.  The purpose of the oast was to take the moisture content down to about 6%.  Without dehydrating, hops can quickly turn brown and eventually spoil.  You could potentially refrigerate or freeze wet hops but the moisture content can significantly shorten storage longevity.   Some like to use wet hops for brewing or dry-hopping but I  find this imparts vegetable-like flavors and aromas.

Sissinghurst Oast House in Southeast England (source below)
Oast houses had several perforated floors where hops were spread out.  At the bottom of the oast house was a kiln that applied heat through the hop laden floors.  Moisture escaped out those chimney-like rooftops.

My Former System for Dehydrating Hops
Ever since I've been growing hops, I used a common household dehydrator to do the bulk of the work.  Unfortunately, I could only dehydrate 4 square feet of hops at a time.  Considering the volume that we have typically picked off the vines at our hop farm, this simply was not enough space.
Former household dehydrator used to dry hops.
Every time we picked hops, it was always enough to fill two of these dehydrators.  We only have one!  The excess was spread out on a table at our apartment or house on paper towels.  We also turned on a fan to keep the air moving across the surface of the table.  When the hops were finished in the dehydrator (typically about 48 hours), we would transfer the table hops to the dehydrator to finish them (another 24 hours).
Dehydrating hops on a table in our old apartment.
Obviously this method of drying hops, though doable, wasn't very practical.  It limited us to how much hops we can truly pick, lengthened the time and work needed, consumed living space, and overall unchillindamos.  It did, however, make the house very aromatic.  If you want to live in an IPA, this is the way to do it!

Building a Hop Oast
The idea for the new Dehydrating-damos Hop Oast came from Food Network's show "Good Eats" hosted by Alton Brown.  The segment on the show is embedded below for you to see.  Basically, he uses common household furnace filters and a box fan to dehydrate meat and make beef jerky.

Last year, I acquired a box fan that a friend was planning on getting rid of with the intention of building a similar dehydrator for hops, the Chillindamos Dehydrating-damos Hop Oast.
The newly built oast hop tray frame.
I purchased some nicer lumber that has been sanded and has round edges (let me know if anyone wants specifics here).  Round edges make it easier when stretching the screen material.  I sized pieces to the box fan's dimensions. 
Hop oast tray frame, simple construction.
There's no need to do anything fancy.  The frame for each of the hop oast trays were built using a hand saw, nails, and wood glue.
Screen material stapled to the hop oast tray frame.
In the screen door section of the hardware store I found this heavy duty plastic-like screening that would work just right.  I used a staple gun with 1/4" staples.
Screening material stretched and stapled on the sides of the oast tray frame.
The trick to a nice taut screen is to start in the center and work your way to the corners, rotating sides each time.  This is the same technique painters use when stretching canvas on a frame.  It also works best if you have help to pull while you staple (thanks Michelle).

Dehydrating-damos Hop Oast
Building four trays and screening three of them for the latest harvest took under two hours.  After, it was a matter of dumping hops in the trays, spreading them out, stacking, and applying the box fan.
Hops dump easily into the hop oast trays.
While the heavily loaded top tray dehydrated in less than 48 hours, I plan to add two more trays (for a total of 6) to decrease the density of hops per tray, encouraging a more effective flow of air.
Hop oast trays stacked easily.
Similar to Alton Brown's dehydrator, the trays are stacked and a box fan is used to keep air flowing around the hops.  From now on, I will dehydrate my hops in the garage considering that its a dry warm environment and away from our usable living space in our house.
Box fan blows air down through the oast trays.
The trays are not directly on the garage floor, I used some wood scraps to put underneath the stack of trays.  This allows air flow to exit out the bottom.  I put the box fan on top of the trays to blow air down.  Even with one of the trays packed tight with hops, air seemed to readily flow out the bottom of the stack.  For the past two harvests, I've only kept the box fan on its lowest speed and the hops were dehydrated in less than a day and a half or about 36 hours.  (I'm thinking that if I decrease the density of the hops in each tray, I might get this process under 24 hours.)
Dehydrated hops are light and papery.
36 hours later, I opened the garage door with aromas of chinook and centennial pouring out.  The hops are light and paper-like, ready for long-term storage prep by vacuum sealing and freezing.  The trays are very easy to carry the hops to the kitchen and to shake clean.  If you need a cheap and simple system to dry a decent volume of homegrown hops, this is working out very well for me.  Let me know if you have any comments or questions!  Cheers.
More Hops = More Chillindamos
Image Source: 
Bishop, Rob. Sissinghurst Oast House. Digital image. Geograph, Sissinghurst Oast House. Geograph Britain and Ireland, 18 Feb. 2006. Web. 12 Aug. 2010. .

Wednesday, August 11, 2010

German Pils, August 11 2010

I'm a huge fan of German Pilseners.  This is one style that I simply have to brew it the way I want it.  The ABV of this brew will exceed the style limits for sure and I'm pretty sure I'll hit the upper limits or higher in IBUs.   Cause that's the way, uh huh uh huh, I like it!
The great part about brewing a pilsener is its simplicity.  German Pilsner malt and some noble hops is all it takes.  Despite the basic ingredients, there's lots of variety out there.  Some pilsners are light and sweet while others can be very dry and hoppy.  Some great pilsners I've had are Bitburger, Warsteiner, and Spaten Pils.  In the recent spirit of doing "research", I picked up a couple of new pilsners to try.
The first is from Allgäuer Brauhaus, their Teutsch Pils.  Allgäuer Brauhaus is in Southern Germany and so it was expected to be small in the hop department (Pilsners, I've read, tend to get drier and hoppier to the north).  I forgot to take a snapshot of the poured beers this round but the Teutsch Pils was golden pale in color with little head retention.  It was more malty than dry and had a light yet balanced hop bitterness and flavor.
Allgäuer Brauhaus Teutsch Pils from Southern Germany.
I'm digging on these German bottle neck labels!
Gotta sport the Reinheitsgebot.
The other pils I picked up was brewed by König Ludwig in Bulgaria. Their Kaltenberg Pils was much more of a Bavarian Pilsener style with a sweeter malt flavor and bigger body.  Hop bittering seemed very low and only subtle in the aroma and flavor.
Tasting these more uncommon bottles makes me wonder how fresh these beers truly are.  I couldn't find this particular label on the König Ludwig's website so this must be adapted or relabeled for export.  It might be time to consider a beer-cation to drink these European gems at their source.
König Ludwig's Kaltenberg Pils from Bulgaria.
König Ludwig uses more of a standard neck label.
German Pilsener, August 11 2010
BJCP Category 2A. German Pilsener (Pils)
5 Gallons, All Grain, Single Infusion Mash, 90 Minute Boil

11 lbs. German Pilsner

90 Minute Single Infusion Mash 148°F

0.65 oz. Magnum 60 min.
0.5 oz. Saaz 30 min.
0.5 oz. Spalt 20 min.
1 Whirlfloc tab 20 min.
0.35 oz. Tettnanger 10 min.
0.25 oz. Saaz 1 min.

White Labs WLP830 German Lager Yeast (thanks, Kara!), Vial to 900ml Starter

OG: 1.063 @ 73°F
FG: 1.010 @ 46°F
ABV: 7.3%

Update 8/26: Racked to secondary.  Current gravity is 1.013 @ 75°F (diacetyl rest).  It will be a couple of weeks until I start lagering.

Evaluation: I took this beer to QUAFF's evaluation panel on November 17th.  I poured this towards the end of the evening so the panel was a bit spent.  While the malt profile was there, it was the hops that needed to go bigger.  I don't think I mentioned gravities and the ABV because those are a tad high as well.  A word of caution was discussed about using Magnum for bittering since its easy to overdo the bittering.  We also talked about loading more noble hops at the end of the hopping schedule.

Tuesday, August 10, 2010

Munich Helles, 8-9-10

Ahhh, helles yeah!  Time to break-in our new Lager Cave with a number of brews where chillindamos is a necessity.  I'm stocked in German malts and hops right now and would like to get 6 lagers underway by the end of the month.  I'm hoping to use September as a lagering month with kegging and dispensing ready for Oktoberfest.  I've never brewed this style before but got a fairly decent scope of the beer design from some reading and a focused podcast on the style (The Jamil Show - Munich Helles).
As with any new brewing adventures, I like to do thorough "research".  I picked up a couple of commercial examples of the style and damn, this beer is awesome.  I could truly drink Munich Helles all day!  The bready, toasty, malt profile is just my thing.  The flavor is balanced with a nice noble hop bittering and subtle flavor.  It dries gently, demanding your palette to beg for more.  Dangerously, I can drink lots of this and that's probably why the German's drink this beer style by the liter.  I first had the Weihenstephaner, their Original Premium.  They claim to be the world's oldest brewery with a date on the bottle "Siet 1040".  Obviously, they had plenty of time to perfect this brew.
Weihenstephaner Original Premium, a commercial example of Munich Helles.
Weihenstephaner, the world's oldest brewery, since 1040.
Weihenstephaner Original Premium Munich Helles.  Awesome looking beer! Not all fizzy-yellow-stuff is bad.
I also had a Paulaner Original Munich.  Paulaner and Spaten both claim the title to have brewed the first lagers.  The profile of this beer was similar to that of the Weihenstephaner though more focused on the slightly sweet pilsner malt flavors.  Very balanced and extremely drinkable.  I certainly enjoyed the Weihenstephaner more but would readily go through a few liters of either of these fantastic brews.

Paulaner Original Munich, a commercial example of Munich Helles.
I'm digging the neck labels of these two beers.  Their shapes are similar.  Any reason?

Another great looking Munich Helles, Paulaner Original Munich.

Munich Helles, 8-9-10
BJCP Category 1D. Munich Helles
5 Gallons, All Grain, Single Infusion Mash, 90 Minute Boil

9 lbs. German Pilsner
0.75 lbs. Munich
2 oz. Melanoidin

90 Minute Single Infusion Mash 150°F

1.35 oz. Hallertauer 60 min.
1 Whirlfloc tab 20 min.

White Labs WLP830 German Lager Yeast (thanks, Kara!), Vial to 900ml Starter
Primary Ferment at 52°F

OG: 1.050 @ 68°F
FG: 1.010 @ 46°F
ABV: 5.5% (temperature corrected)

Update 8/24: Racked to secondary.  Current gravity is 1.0105 @ 71°F (diacetyl rest).   Lagering will begin in a couple of weeks.

Evaluation: I took this to QUAFF's evaluation panel on November 17th.  Of the 5 beers I brought for feedback, this one seemed to be the best example of the style.  Harold searched for signs of improvement but only suggested to re-brew this in January for NHC first round.  That was good news to hear!