Showing posts with label dehydrating hops. Show all posts

Sunday, May 8, 2011

Grow Some Hops!

Information Presentation on Growing Hops
Last month I gave a presentation to my homebrew club, QUAFF, on the basics of growing your own hops.  Several have asked for the presentation to be available for reference.   Here's the general presentation on growing your own hops at home.  Post any questions in the comments.  There were several good questions at the end of the presentation.

How do I see the speaker notes!?
I have speaker notes added to much of the presentation slides but in order to see them, you need to view full window and select Actions, View speaker notes.  Leave open the pop-up, it will change when you move through the presentation.  Enjoy!

To see the speaker notes, you need to view the presentation in a full window.

At the bottom, select Actions then Show speaker notes


Homebrewers' Rhizome Swap Next Year!
This season, I think I was able to provide rhizomes to about 20 homebrewers with the hope that our local homebrewing community also becomes a hop growing community.  If you missed it, I will have plenty again next year!  Fellow QUAFFer, homebrewer, blogger, and hop grower, Jeff Crane, suggests we declare an official rhizome swap every spring.  Should be a great way to kick off the season each year and recruit more homebrewers to be hop growers.

Thursday, August 12, 2010

Dehydrating-damos Hop Oast

With the volume of hops I've been growing these days, I've long been needing a better system for dehydrating larger volumes of freshly picked hops.  According to Wikipedia, freshly picked hops can have a moisture content of 80%.  Prior to modern methods of dehydrating and making pellet hops, growers built a hop oast house to remove moisture from whole hops.  The purpose of the oast was to take the moisture content down to about 6%.  Without dehydrating, hops can quickly turn brown and eventually spoil.  You could potentially refrigerate or freeze wet hops but the moisture content can significantly shorten storage longevity.   Some like to use wet hops for brewing or dry-hopping but I  find this imparts vegetable-like flavors and aromas.
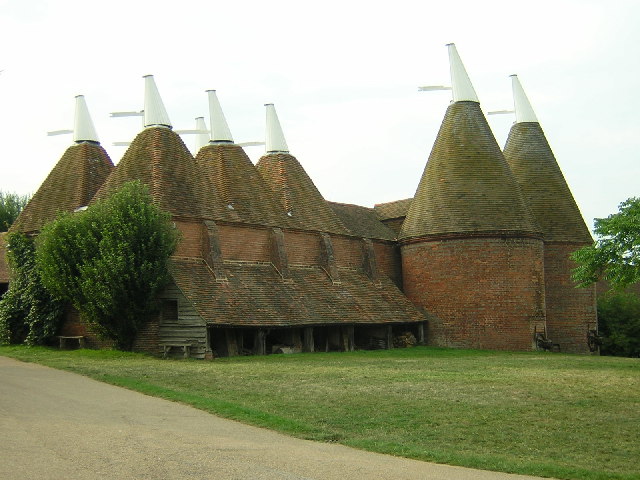
Sissinghurst Oast House in Southeast England (source below)
Oast houses had several perforated floors where hops were spread out.  At the bottom of the oast house was a kiln that applied heat through the hop laden floors.  Moisture escaped out those chimney-like rooftops.

My Former System for Dehydrating Hops
Ever since I've been growing hops, I used a common household dehydrator to do the bulk of the work.  Unfortunately, I could only dehydrate 4 square feet of hops at a time.  Considering the volume that we have typically picked off the vines at our hop farm, this simply was not enough space.
Former household dehydrator used to dry hops.
Every time we picked hops, it was always enough to fill two of these dehydrators.  We only have one!  The excess was spread out on a table at our apartment or house on paper towels.  We also turned on a fan to keep the air moving across the surface of the table.  When the hops were finished in the dehydrator (typically about 48 hours), we would transfer the table hops to the dehydrator to finish them (another 24 hours).
Dehydrating hops on a table in our old apartment.
Obviously this method of drying hops, though doable, wasn't very practical.  It limited us to how much hops we can truly pick, lengthened the time and work needed, consumed living space, and overall unchillindamos.  It did, however, make the house very aromatic.  If you want to live in an IPA, this is the way to do it!

Building a Hop Oast
The idea for the new Dehydrating-damos Hop Oast came from Food Network's show "Good Eats" hosted by Alton Brown.  The segment on the show is embedded below for you to see.  Basically, he uses common household furnace filters and a box fan to dehydrate meat and make beef jerky.

Last year, I acquired a box fan that a friend was planning on getting rid of with the intention of building a similar dehydrator for hops, the Chillindamos Dehydrating-damos Hop Oast.
The newly built oast hop tray frame.
I purchased some nicer lumber that has been sanded and has round edges (let me know if anyone wants specifics here).  Round edges make it easier when stretching the screen material.  I sized pieces to the box fan's dimensions. 
Hop oast tray frame, simple construction.
There's no need to do anything fancy.  The frame for each of the hop oast trays were built using a hand saw, nails, and wood glue.
Screen material stapled to the hop oast tray frame.
In the screen door section of the hardware store I found this heavy duty plastic-like screening that would work just right.  I used a staple gun with 1/4" staples.
Screening material stretched and stapled on the sides of the oast tray frame.
The trick to a nice taut screen is to start in the center and work your way to the corners, rotating sides each time.  This is the same technique painters use when stretching canvas on a frame.  It also works best if you have help to pull while you staple (thanks Michelle).

Dehydrating-damos Hop Oast
Building four trays and screening three of them for the latest harvest took under two hours.  After, it was a matter of dumping hops in the trays, spreading them out, stacking, and applying the box fan.
Hops dump easily into the hop oast trays.
While the heavily loaded top tray dehydrated in less than 48 hours, I plan to add two more trays (for a total of 6) to decrease the density of hops per tray, encouraging a more effective flow of air.
Hop oast trays stacked easily.
Similar to Alton Brown's dehydrator, the trays are stacked and a box fan is used to keep air flowing around the hops.  From now on, I will dehydrate my hops in the garage considering that its a dry warm environment and away from our usable living space in our house.
Box fan blows air down through the oast trays.
The trays are not directly on the garage floor, I used some wood scraps to put underneath the stack of trays.  This allows air flow to exit out the bottom.  I put the box fan on top of the trays to blow air down.  Even with one of the trays packed tight with hops, air seemed to readily flow out the bottom of the stack.  For the past two harvests, I've only kept the box fan on its lowest speed and the hops were dehydrated in less than a day and a half or about 36 hours.  (I'm thinking that if I decrease the density of the hops in each tray, I might get this process under 24 hours.)
Dehydrated hops are light and papery.
36 hours later, I opened the garage door with aromas of chinook and centennial pouring out.  The hops are light and paper-like, ready for long-term storage prep by vacuum sealing and freezing.  The trays are very easy to carry the hops to the kitchen and to shake clean.  If you need a cheap and simple system to dry a decent volume of homegrown hops, this is working out very well for me.  Let me know if you have any comments or questions!  Cheers.
More Hops = More Chillindamos
Image Source: 
Bishop, Rob. Sissinghurst Oast House. Digital image. Geograph, Sissinghurst Oast House. Geograph Britain and Ireland, 18 Feb. 2006. Web. 12 Aug. 2010. .

Tuesday, August 26, 2008

Hops Storage

After a great weekend of wine tasting in Santa Barbara county and back from a summer of adventure, its time to get all the hops off the vines and in storage.
This year, we could always pick more than we could handle. Since the dehydrator can only hold about 4 square feet of hops, I spread the rest on a table on top of a paper towel.Spacing between the cones is key. Too close and the moisture gets trapped and turns your hops brown. Another thing I've found useful is to have a fan lightly blowing on the hops. An overhead fan would probably work the best but I just use a stand up fan. Above is about 7 ounces (dry weight) of centennial hops.
Here's some of the bigger centennial cones. Large but not as big as the chinook cones. Magnum cones get this big as well and the vojvodina hops are significantly smaller.
I dehydrate all of my hops until they are papery dry. After, I cut a foodsaver bag at three notch lengths (marked on the side of the bag roll). This size allows me to seal hops in 1-1.5 ounce incraments, perfect for sizing hop additions.
I fill the hops to the top of the bag then gently squish them down so there's enough head space to close the vacuum sealer mechanism and to ensure a clean seal.
Before sucking and sealing, I like to distribute the hops evenly in the bag. This will allow the bag to seal flat for easier storage.
While the foodsaver is vacuuming out the air, I press lightly to make sure the bag will seal as flat as possible. This is important since freezer room is really limited. Several flat bags take up very little space compared to clumpy bags.
Mission accomplished, hops are now vacuum sealed for seasonal storage in the freezer.
I adjust my scale to the weight of a three-notch length foodsaver bag and easily weigh the contents after sealing.
Label, date, and weight. Hopefully, you can see how flat the hops have been pressed after vacuum sealing.
In my hand is over 1/2 pound of great hops!

Monday, July 28, 2008

Hop Farm, July 28 2008

Harvest Time!
We were at the hop farm this weekend for my wife's PhD party when I noticed that several vines are ready for harvesting. Actually, there were more hops ready than I can possibly handle to process. Next year, I simply have to make a large dehydrator. Today we picked about a pound or so of chinook and centennial hops (that's what it will amount to after dehydration).
Here's the current view of the farm. All but one mound has grown (the bottom row chinook that was torn up by rabbits). Magnum, as usual has just started cone production. Though the top row centennial had trouble getting started this year, its counter part on the bottom row is nearly ready for harvest. I picked all I could from the top row which was completely ready.
Of course, its always nice to have help. My wife, Dr. Michelle, and Dr. Courtney (I don't think I could have found smarter assistants!) helped pick the chinook. There were so many to pick that I had to tell them to stop. Our dehydrator can only hold so much and while I can lay out hops on tables in the house to start drying, we're leaving for Hawaii on Friday. I want to make sure everything is dehydrated and vacuum sealed by then.
Above is a view of the top wire chinook. A few weeks ago, these were just getting started. The density is likely attributed to a good watering schedule and a good manure base at the season start.
I'm always impressed with the size of the chinook hops we grow. They are large, healthy, and very abundant. Also, their stability for storage is amazing. In the background are the hops that didn't fit in the dehydrator. They'll need to wait for about 48 hours before being moved to dehydrator.
Here's one of the bigger of the chinook cones. In my last blog, people wanted to know if I had small hands. Very good question since it seems unlikely to have a hop cone the length of any finger. I wouldn't call my hands small by they aren't large either. My glove size is typically small to medium.
If my hand doesn't give you a sense of how big these cones are, then perhaps this will better scale the chinook hops.
Here's the dehydrator we use. The capacity is great for its compact size. Considering that we only use it for hops, it readily fits in a cabinet for storage during the rest of the year. Though building a larger dehydrator will be very necessary next year, this works for smaller batches.
A nicer dehydrator can be a bit expensive, even for a used one on eBay. To dehydrate hops, it is very important that no heat is applied. I keep our dehydrator at 85 where it produces no heat. The only heat comes from the electrical fan in operation. I feel like I've posted all these details in my last blog, dejavu! This dehydrator has settings for other applications but we only used it for hops.
Above you can see the four racks in the dehydrator. Next harvest, I'll show how much surface area this particular model has. I think the racks are 1 foot by 1 foot but they might be a bit bigger. Straight off the vine, hops typically need about 48 hours. The hops on the table will only need about 24 hours.