Showing posts with label brew ware. Show all posts

Saturday, April 16, 2011

BetterBottle Volume Levels and More

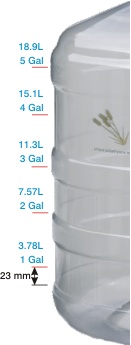
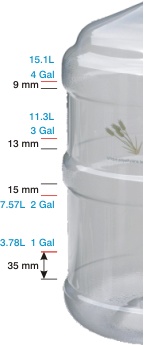
5 Gallon BetterBottle Volume Levels
6 Gallon BetterBottle Volume Levels
I really need to just mark my BetterBottles for volume levels with tape or stickers.  The website for BetterBottles shows the volume levels (select "Carboys" from the left-side navigation).  Linked here is the volume levels for the 5 and 6 gallon carboys.
An even better BetterBottle would have volume levels already marked for the end user.  Just sayin!  It would have been really awesome if the volume levels were stamped in the actual locations with gallon (at least 0.5 gallon accuracy) and liter markers.
Product information on their website also indicates the nominal volume (5 or 6 gallons) reached at the bottom of the neck.
Overall, I really wish I would have thoroughly navigated BetterBottle's website before using the bottles for the first time.  I initially only looked at information for cleaning and sanitizing since my method cleaning glass carboys would end up scratching the internal surfaces (some use a brush anyway).  I really didn't look beyond their suggestions for cleaning and sanitizing.   
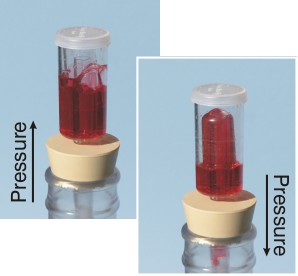
There's some other great information on the website that I would have also found very useful.  One immediate discovery one gains when using a BetterBottle for the first time is that the flexible walls create back pressure on standard 3-piece airlocks.  I typically use a bit of Star-San solution in my airlocks and really don't want this in my beer.  Lifting or moving a full BetterBottle can squeeze the internal volume causing positive pressure to be released by the airlock.  Once you put down the bottle, the pressure is reversed, creating a negative pressure internally.  3-piece airlocks are designed to only expel positive pressure from the bottle so when there's negative pressure, the liquid inside the airlock gets sucked into the bottle.  Very unchillindamos!  Better Bottle's website shows what happens:
Effects of positive and negative pressure on 3-piece airlocks using BetterBottles.
I've quickly learned to carefully use 3-piece airlocks with my BetterBottles and try to use bungs or vented silicon stoppers when moving the carboys.  BetterBottle has a product called a DryTap (select "DryTap Air Lock on the left-hand side navigation) that also avoids the situation above.
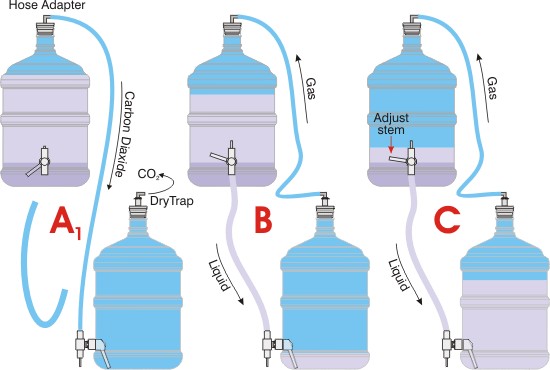
Another really cool use of their DryTap is for oxygen-free transferring.  Check this out:
Similar to using a Carboy Cap, BetterBottle's DryTap can also be used for oxygen-free transferring.
More applications or transferring can be found on their website, click "How-To Tips" on the left-side navigation of the site.
After using BetterBottles for a while now, I'm a fan.  Strong, extremely light, safe, and fairly easy to clean, homebrewers and home wine makers can't go wrong.  Of course, I'd rather have a stainless steel conical but for 5 gallon purposes, the BetterBottle is the best choice out there.
Speaking of cleaning these things, I'm likely going to get this Carboy Cleaner to get out the stubborn yeast build-up when PBW doesn't seem to be enough.  I'm simply going to buy the replacement pads and bolt them on my lees stirrer since it only gets occasional use.  Hopefully, using the Carboy Cleaner will make using BetterBottles even better.

Image Sources:
BetterBottle Product Images. Digital image. Better-Bottle Bottles, Better-Bottle Carboys, and Better-Bottle Fermenters for Home Winemaking and Home Brewing. High-Q, Inc. Web. 16 Apr. 2011. .

Sunday, March 13, 2011

Mark's Keg and Carboy Washer

There's a new gadget out there that essentially cleans-in-place carboys, kegs, and lines (transfer, pump, beverage, gas, chilling). It's called  Mark's Keg Washer.  The homebrew DIYer can build such a gadget for a fraction of the cost using an immersion pump and common plumbing hardware.  Check out these videos of Mark's Keg Washer in action:


Keg & Carboy Washer Part 1 from Olin Schultz on Vimeo.

Keg & Carboy Washer Part 2 from Olin Schultz on Vimeo.

Keg & Carboy Washer Part 3 from Olin Schultz on Vimeo.

Sunday, November 7, 2010

Vienna Lager, November 7, 2010

The last Vienna Lager I made was great!   I also brewed up an interesting Vienna Agave Lager last year that was well received.  I'm hoping that this beer will be an instant hit with our New Year's party crowd and I'd like to bottle out some for evaluation.
On another note, I'm still dialing in the recirculation immersion wort chiller.  The biggest problem was with the Quick Disconnects (QDs) which were clogging the pump system.  In both sides of the QD components, a cross-hair structure would collect hop matter and slow the March pump to a trickle. 
QD's for the March Pump.
Shown is the tubing end of the QD but there's also two other components that are attached to the pump. They also have the same structure imposing on the flow.  A total of four blocking points have been reeking havoc on the recirculation flow during wort chilling.  Using a Dremel tool, I drilled and sanded out all four flow restrictions.
Left QD shows the original "hop blocker".  Right, rough drilling.
After cleaning them up with a sanding bit, I could easily tell the flow rate will have significantly less interruption.  The only restriction points are now the 1/2" barbs.  After testing this out today, no small hop matter and trub was locked up at any point along the recirculation route.  I'm chillindamos again.
Using a dremel, both QD's are opened up for business!
The only other frustration, and restriction point, on the recirculation pump system has been with the kettle spigot.  I took the spigot over to Home Depot and Lowe's during the summer to try and find a replacement with no avail.  It seems the threading was not standard.  Larry over at Home Brew Mart and Ballast Point Brewing identified the pot with the spigot to be an Italian design with its own spec.  He suggested some options including simply taking out the spigot tip (I had managed to squeeze in a narrow barb that hasn't been working very well - the tightest restriction point at the moment) and finding some 1/2" ID tubing to stretch right over it.  We also talked about drilling a new hole and replacing the spigot.
With heat left over from the boil, the tubing molded easily to the Italian spigot.
 Since the contours of the kettle spigot are thicker on the end, the tubing seemed to create a good seal without the use of any clamps.
Tubing leaving the kettle to the March Pump.
 I thought this tubing was high temp and originally thought I might have to leave it on the kettle at all times.  I had to remove it when it started showing signs of melting, yikes!  At least I was able to cut off that section and found that it was really easy to remove and reinstall the tubing with a tight seal whenever I wanted.
Immersion Chiller combined with Wort Recirculation.
Further modifications have led to even more chillindamos!  The circulation happening in the pot was significant compared to before the dremel work and tubing makeover.  I went through even less water and reduced more time to chill the wort.   Now back to beer.

Vienna Lager
BJCP Category 3A. Vienna Lager
5 Gallons, All Grain, Step Infusion Mash, 90 Minute Boil

6 lbs. Vienna
3 lbs. Munich
3 lbs. Belgian Pilsner
4 oz. Caramunich
4 oz. Caravienne

Protein Rest at 122°F for 7 minutes
(0.9 qts/lb. raised to 135°F)
Saccharification Rest at 148°F for 60 minutes
(0.5 qts/lb. raised to 212°F)
Fly-sparged at 170°F

1.5 oz. Tettnanger 60 min.
1 Whirlfloc tab 20 min.
1 oz. Spalt 10 min.

White Labs WLP830 German Lager Yeast   (100ml of fresh slurry thanks to Kara!)
Currently in ferment at 52°F

OG: 1.053 @ 73°F
FG: 1.013 @ 40°F
ABV: 5.6%

Friday, July 23, 2010

Recirculation Immersion Chilller

...and now, for some chilling.  Literally.
I got this idea from Jamil Zainasheff on his website MrMalty.com.  Jamil shows his Whilpool/Immersion Chiller in great detail on his site.  He's also discussed this modification to his homebrewing system on his internet radio show, The Jamil Show.  While many others go to fancy counterflow chillers or plate chillers, there's actually some good benefits to using an immersion chiller (see Jamil's website for a good discussion on the pros and cons).  The biggest downsides, however, is that it takes longer and uses lots more water.  Adding a recirculation element or whirlpool allows the wort to constantly be moving inside the kettle while the chiller is in the process of heat exchanging.  This increases the surface contact of wort to the chiller, effectively improving chilling time and water efficiency.  Adding a recirculation element to an immersion chiller can bank on the benefits while strongly chiseling away the downers.  Today, I improved upon my wort chilling system to increase water efficiency and to decrease the time needed to take wort from 212°F to less than 80°F.

I made a bigger wort chiller about 2 years ago with 50 feet of 3/8" OD copper.  While it looks like a job well done, I've had some minor issues.  First, 50 feet is a long distance and you need to have decent pressure to push water through that much restriction (maybe 50 feet of 1/2" OD would have made this better?).   I've attempted to use a pump to recirculate ice water through the chiller with limited success (works for several minutes at a time but stalls often).  The pump simply experienced too much back pressure.  Second, while I attempted to make good bends in the copper using a spring bender, I ended up making a few kinks which drastically increased restriction on an already overly distant length of 3/8" copper.  Here's a couple of pictures when I had just finished building a larger chiller.  Notice the kinks from too sharp of bends on the upper image.
Immersion Chiller built 2 years ago.
The new chiller keeps hop trub in the center while cooling much of the column of wort.
So the first order of business before adopting Jamil's whirlpool idea is to remove those kinks!  With a pipe cutter, I was able to remove the kinked locations and ended up taking off about 3-4 feet of copper.  Even though only a few feet, every little bit of restriction helps.
Several of my previous bends caused kinks in the copper pipe that limited the flow of water.
After a couple of chops, all kinks were eliminated.
After cutting out the kinks, the next challenge was to carefully bend the pipe to meet the kettle lid's notch without creating too sharp of angles or additional pipe.
Spring pipe benders are really useful for creating the curves on your wort chiller.
I found using a spring pipe bender (available at hardware stores near the copper tubing) useful to avoid making kinks.  You simply need to be patient and have enough pipe for leverage when bending.  Over bend each time and bend back to desired position.  Bends close to one another can be very challenging.  Just know that its tough to make different curves in a close sequence.
Refurbished and kink-free immersion wort chiller.
After trying this out with today's Kölsch, it works so much better.  At the end of chilling, I usually blow out the excess water and it was drastically easier to blow it out this time.  Also, the back-pressure on the tubing usually causes a leak on the IN-tube.  This didn't occur!  I suppose I can try pumping ice water again with my March Pump.

Onward to adding the recirculator/whirlpool:
I took about a foot section of the removed copper pipe and worked some angles so that beer can be pumped from the kettle spigot, through the kettle lid notch, and directed to flow alongside the immersion wort chiller.
This length was cut from my wort chiller and reshaped to direct circulating wort flow.
Using the spring pipe bender makes bending easier on the most part.  At least, it help you avoid kinking.  I would suggest working with pipe sections several inches longer than you anticipate.  Otherwise, its nearly impossible to bend near the end of the pipe.  You can always cut off excess later using a pipe cutter (about $10 at the hardware store).  Also, you should keep some sand paper on hand (220 grit sandpaper and a 400 sanding sponge seemed to do the job well) for sanding down those rough edges after cutting.  Don't forget to wash and rinse well before using! 
Immersion wort chiller with recirculation arm to move hot wort circular around the immersion chiller.
Here's how I do my wort chilling.  At the end of my brewing session, I stir the wort with a large spoon and get the wort moving fairly quickly in a circular fashion.  While stirring, I slowly move the stirrer towards the center of the kettle to create a whirlpool.  After waiting several minutes to allow the whirlpool to come to a halt whilst center settling the hop and trub, I slowly add the clean wort chiller to the center of the pot (most of the hop trub will remain in the center of the chiller's coils).  I allow the chiller to "bake" for several minutes for sanitation purposes.  At the same time, I arrange the pump to draw from the spigot and return to the kettle via the recirculation arm.  You can see this crafty shaped piece in the picture above.  As soon as possible, I begin recirculation prior to chilling to also "bake" the high-temp lines, pump (this pump handles high-temps), and copper pipe.  After sanitation is complete, I turn on the chiller using hose water.  Today, I think I cut my chilling time and water usage in half.  Not bad considering that summer temperatures have increased the temps of tap water and my black hose soaking up the summer heat isn't helping either.
Here, you can see the pump setup.  The bucket collects heated water from the immersion chiller.
During the summer months around here, the process of chilling the wort can take longer than the rest of the year and a better solution is needed.  I bought this pump towards the end of last season so that I can recirculate ice water through my immersion chiller.  It seems that the recirculator arm is more useful.  If I had two pumps, I could do both recirculation of wort and utilizing ice water.
Jamil's setup has two exit points for the wort though I'm not sure its necessary for a 5 gallon setup.  Click Here to see Jamil's Whirlpool/Immersion Chiller for some more info.
Only one potential issue to address.  I did notice that some hop fragments managed to collect at the incoming pump connection.  I have a QD here (quick disconnect) that has a plastic + going through the center of where the wort flows.  This cross hair of plastic picked up some hop matter and likely slowed the flow at some point.  I might need to add a filter element in the kettle or along the line to deal with this.
The pump was very easy to clean.  While the pump was running, I slowly closed the kettle valve and slid off the tubing.  The pump returned the remains to the kettle and then the pump was shut off.  I removed the recirculator arm.  I put the incoming tubing in the water bucket and pumped fresh water through the system.  I took off the QDs and dipped them in water to remove the hop matter that collected.  Last, I put the incoming tubing in a bucket of sanitizer (StarSan) and pumped that through for just a bit.  Finally, I removed the tubing for air drying.  Very minimal effort for a huge increase in chillindamos!
Wednesday, July 29, 2009

CO2 Injector for Cornelius Kegs

First of all, I wanted to give HUGE props to Genuine Innovations for providing not only a convenient product for homebrewers but mostly for providing a lifetime warranty and exceptional customer service.

A few years ago I purchased a Cornelius Keg Ball Lock Injector/Charger from William's Brewing for $20. Prior to this item, I schlepped around a 5lb. CO2 tank and regulator to take kegged homebrew on the road. Very unchillindamos. Since then, the injector was very easy to travel with and simple to teach others to use. I would use two to three 12-gram CO2 cartridges to dispense a 5-gallon keg of beer and could buy the cartridges in bulk also from William's Brewing for $0.69 each (16-gram CO2 cartridges also available in bulk for $0.99 each).
Earlier this month, I was dispensing my Independence Day IPA using the CO2 injector when the plastic area that connects to the ball-lock broke. This dissapointed everyone enjoying the brew but I managed to hold the charger inplace to inject enough pressure to dispense a few pitchers (at the cost of an entire cartridge).


At the time, I figured that I got my use out of it and may as well buy another. Instead of buying the entire thing, I decided to check to see if I can just purchase the top portion from the manufacturer. I found on their website that they provide a warranty on all types of their injectors:
Genuine Innovations warrants that all products will function properly and safely for an unlimited time. Should any product fail to perform safely or properly please return it to the place of purchase.
I contacted customer service at William's Brewing to see if they would arrange the warranty. Janis Martinez at William's responded to contact the manufacturer since it was beyond their warranty time and also said that they were very good at sending out replacements.
After submitting a brief explanation to Genuine Innovations via their Contact Us form, I was quickly contacted by DJ Lopez who clarified the item requested for warranty replacement and offered to send it out immediately. BTW, the email response time for each message was nearly immediate! I was headed out of town and let him know that I would be unable to accept receipt of a package and DJ said he'd send it out upon my return.
The replacement arrived today, two days after my return from a chillindamos vacation. Awesome customer service! The gross design is the same but the compromised location has apparently changed.

Anyone else looking to increase your portability of your draft system, I would highly recommend Genuine Innovations CO2 charger. Good products with excellent customer service and lifetime warranties are a rare commodity. Very chillindamos!

Saturday, May 24, 2008

Making a New Immersion Chiller

I'm having some chillindamos issues! I've been using the same wort chiller since my extract days. The chiller was really designed for a five gallon pot but it really was inadequate when I upgraded to my 9 gallon kettle. It took longer but got the job done. The problem really occurs during the summer months when the tap water is significantly warmer. During that time, chilling wort from boiling to around 80'F could take more than 2 hours.

I was hoping that building my own would be a fairly inexpensive solution. I considered purchasing a counter-flow or plate system but cost and practicality in an apartment persuaded me that an improved immersion chiller would be more ideal.

Making your own used to be very inexpensive but recent price increases in metals have made this an expensive project. I opted for 50 feet of 3/8 OD copper tubing. 50 feet will provide lots of surface area for heat exchange. I'd have to find the receipt, but I think the copper tubing was $60. Other brewers have reported paying around $20 a while ago.

Using a spring bender and a cornelius keg, I shaped the tubing cylindrically. The spring bender, I learned, is more for short angle bends. I still experienced some crimping for steeper bends. This is not really a problem since the flow rate going through will be slow.

Making the final bends was challenging but I finished the project under an hour. My kettle lid is notched so the greatest challenge was making sure both tubes exited in that exact location while leaving the coil centered in the pot.

Lastly, I need to clean the new immersion chiller with a solution of vinegar to prepare it for tomorrow's brew test.

During the summer months, the old chiller will be put back to use as a pre-chiller. After the wort temperature drops below 100'F, the tap-water will enter the small chiller first. This chiller will be immersed in an ice bath to pre-chill the water before entering the kettle chiller. I'm hoping that this combination will be more efficient during the summer. Here's to wort chillindamos!

Corneius Keg Plastic Replacement

I split a 4-pack order of corny kegs recently. Buying them individually can get expensive, especially with shipping costs. Now, I have more than enough kegs - 12 five-gallon kegs. Though they shipped with o-ring replacements, we got two kegs that had plastic tubes for the gas-in side. Often, old o-rings and plastic have odors retaining from the keg's former use (often soda). Plastic can have other issues including harboring bacteria.


Before use, we ordered replacements (unsure of metal type). William's Brewing has a great selection of replacement parts for kegs. The problem was that the new tube would not fit in the keg. This particular keg seemed to be machined for the plastic style tube.


No problem, just need to drill out the excess to make it fit. The drill bit is about the same diameter as the tubing, maybe a bit larger. Since an o-ring seals the top, there's no need to drill for a snug fit. After drilling through, I switched to high speed and ran the bit through the hole to clean it up. The tube fits just right.
Any new keg, I spend the time doing a thorough cleaning typically with dish soap and scrub brushes. All fittings are inspected, cleaned, and sanitized. I also lubricate all o-rings and poppet valves with keg-lube. The rubber handles and foot is sprayed with silicone. Lastly, I leave a solution of iodophor in the keg along with CO2 so they keg is ready for a brew in the near future.

Sunday, March 30, 2008

Rebar Stakes For The Hop Farm

Jim is bending some new rebar stakes for the hop farm. Just after this, he realized that a vise grip and some gloves would be a good idea! The rebar stakes anchor the trellis lines for the hop vines to crawl. I use aluminum wire for the trellis and it has about a 2 year life span before the rebar aids in oxidation and it breaks.
Sent from my mobile phone.